
you’re probably scrolling through recipe after recipe, looking for something that won’t have you sweating over a hot stove when it’s 90 degrees outside. Well, guess what? I’ve got your back with these frozen yogurt bites that are about to become your go-to summer treat. No oven required, minimal prep time, and they taste like you actually know what you’re doing in the kitchen 🙂
I stumbled across this recipe during one of those “I need something sweet but healthy-ish” moments we all have. You know the ones – where you’re staring into your fridge like it holds the secrets of the universe? These little frozen gems saved my sanity that day, and they’ll probably save yours too.
Why Frozen Yogurt Bites Are Actually Good
Here’s the thing about frozen yogurt bites – they’re basically the perfect dessert disguised as a healthy snack. You get that creamy, indulgent feeling without the guilt trip that usually follows. Plus, they’re portion-controlled, which means you can’t accidentally demolish an entire pint of ice cream (we’ve all been there, no judgment).
What makes these bites so brilliant? They’re customizable, freezer-friendly, and honestly taste better than most store-bought frozen treats. IMO, once you try making these at home, you’ll wonder why you ever bothered with those overpriced frozen yogurt shops.
The Magic Behind the Method
The secret to perfect frozen yogurt bites lies in three key factors:
- The right yogurt consistency – too thin and they’ll be icy, too thick and they won’t freeze properly
- Proper freezing technique – this isn’t rocket science, but timing matters
- Smart flavor combinations – because plain vanilla gets boring fast
Ever wondered why some frozen treats turn into rock-hard ice blocks while others stay perfectly creamy? It’s all about the fat content and how you handle the freezing process.
Essential Ingredients for Perfect Frozen Yogurt Bites
Let me break down what you’ll need for these frozen yogurt bites. I’ve tested this recipe more times than I care to admit, so trust me when I say these ratios work perfectly.
Base Ingredients:
- 2 cups Greek yogurt (full-fat works best – don’t go fat-free unless you enjoy disappointment)
- 1/3 cup honey or maple syrup (your sweetener of choice, really)
- 1 teaspoon vanilla extract (the real stuff, not that artificial nonsense)
- Pinch of salt (seriously, don’t skip this – it makes everything taste better)
Mix-In Options (This Is Where It Gets Fun):
- Fresh berries – strawberries, blueberries, raspberries (whatever’s in season)
- Chocolate chips – mini ones work best for even distribution
- Crushed cookies – Oreos, graham crackers, whatever makes you happy
- Nuts and seeds – chopped almonds, pistachios, chia seeds
- Coconut flakes – toasted or regular, both work great
The beauty of this recipe? You can literally throw in whatever sounds good to you. I’ve made batches with everything from crushed pretzels to freeze-dried fruit, and they all turned out amazing.
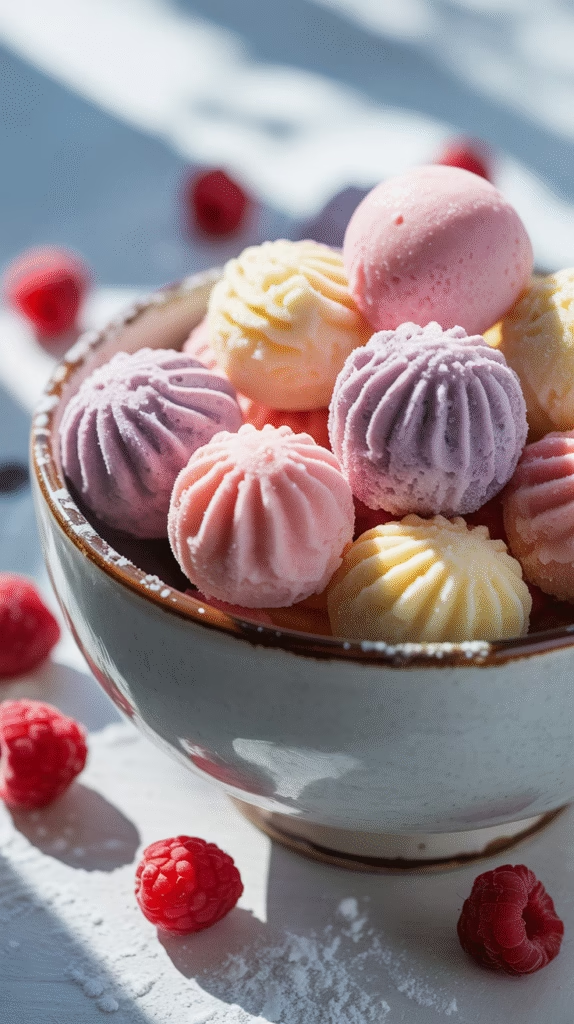
Step-by-Step Recipe (It’s Easier Than You Think)
Alright, let’s get into the actual frozen yogurt bites recipe. Fair warning – this is so simple you might feel like you’re cheating.
Step 1: Prep Your Workspace
Get yourself a mini muffin tin or silicone molds. I prefer silicone because these babies pop out like a dream, but regular muffin tins work if you grease them well. You’ll also want to clear some freezer space – trust me, nothing’s worse than balancing a full tray while playing freezer Tetris.
Step 2: Mix the Base
In a medium bowl, whisk together your Greek yogurt, honey (or maple syrup), vanilla extract, and that crucial pinch of salt. The mixture should be smooth and well combined. Taste it – this is your base flavor, so adjust the sweetness if needed.
Step 3: Add Your Mix-Ins
Here’s where you can get creative with your frozen yogurt bites. Fold in whatever add-ins you’ve chosen. I usually go with about 1/2 to 3/4 cup total of mix-ins, but honestly, you do you. Want more chocolate chips? Go for it. Extra berries? Why not.
Step 4: Fill and Freeze
Spoon the mixture into your molds, filling each about 3/4 full. Give the tray a gentle tap on the counter to settle everything and eliminate air bubbles. Pop them in the freezer for at least 3-4 hours, though overnight is even better.
Step 5: Unmold and Store
Once they’re completely frozen, pop those frozen yogurt bites out of their molds. If you used a regular muffin tin, let them sit at room temperature for 2-3 minutes to make removal easier. Store them in an airtight container in the freezer for up to 3 months (if they last that long).
Pro Tips That’ll Make You Look Like a Frozen Treat Genius
Want to take your frozen yogurt bites from good to absolutely incredible? Here are some tricks I’ve learned through trial and error (mostly error, if I’m being honest).
Temperature Matters
Your yogurt shouldn’t be ice-cold when you’re mixing. Let it sit at room temperature for about 15 minutes before you start. This makes mixing easier and helps achieve that perfect creamy texture.
Layer Like a Pro
Try creating layered frozen yogurt bites by filling the molds halfway with one flavor, freezing for 30 minutes, then adding a second layer. Strawberry and vanilla? Classic. Chocolate and peanut butter? Chef’s kiss
Texture Tricks
For extra creamy bites, add a tablespoon of cream cheese to your base mixture. For a lighter texture, fold in some whipped cream just before molding. Both techniques create different but equally delicious results.
Storage Smarts
Prevent freezer burn by pressing plastic wrap directly onto the surface of your stored frozen yogurt bites before sealing the container. They’ll stay fresh and creamy much longer this way.
Flavor Combinations That’ll Blow Your Mind
Let’s talk about some frozen yogurt bites flavor combos that have become absolute favorites in my house. These aren’t your basic vanilla situations – we’re going full flavor adventure here.
The Classics:
- Strawberries and Cream – fresh strawberry pieces with a touch of lemon zest
- Chocolate Chip Cookie Dough – vanilla base with mini chocolate chips and cookie dough pieces
- Blueberry Lemon – fresh blueberries with lemon zest and a hint of lavender
The Adventurous:
- Tropical Paradise – coconut flakes, dried pineapple, and lime zest
- Peanut Butter Pretzel – PB swirled base with crushed pretzels
- Chai Spice – cinnamon, cardamom, and a touch of black pepper (sounds weird, tastes amazing)
The Indulgent:
- S’mores Supreme – graham cracker crumbs, mini marshmallows, and chocolate chunks
- Salted Caramel Crunch – caramel swirl with sea salt and toffee bits
- Nutella Dream – Nutella swirled base with crushed hazelnuts
Which combo sounds most tempting to you? FYI, the s’mores version is dangerously addictive – consider yourself warned.
Troubleshooting Common Frozen Yogurt Bite Disasters
Even though this frozen yogurt bites recipe is pretty foolproof, sometimes things go sideways. Here’s how to fix the most common issues:
They’re Too Hard
This usually happens when you use fat-free yogurt or don’t add enough sweetener. The sugar and fat help keep them creamy. Next time, stick with full-fat Greek yogurt and don’t skimp on the sweetener.
They’re Too Soft
Your freezer might not be cold enough, or you didn’t freeze them long enough. Make sure they’re solid before trying to unmold them. Patience is key here – rushing the process never ends well.
They Taste Bland
You probably needed more flavor. Greek yogurt has a tangy base that can overpower subtle flavors. Don’t be shy with your vanilla extract, and always taste your base mixture before freezing.
They Won’t Come Out of the Molds
Let them sit at room temperature for a few minutes, or dip the bottom of the mold in warm water for 10-15 seconds. Works every time.
Making Frozen Yogurt Bites Kid-Friendly (Because They’ll Love These Too)
Want to get the kids involved with these frozen yogurt bites? They’re actually perfect for little hands to help with. Here’s how to make it a fun family activity:
Let them choose their own mix-ins and create custom flavors. Set up a “frozen yogurt bite bar” with different options in small bowls. Kids love having control over their food choices, and this gives them that power.
Use fun-shaped molds – stars, hearts, animals, whatever makes them excited. The sillier, the better. You can find tons of options online or at kitchen stores.
Make them extra colorful by adding natural food coloring or using naturally colorful ingredients like berries, spinach (for green – they won’t taste it, I promise), or turmeric (for yellow).
The Health Factor (Yes, These Are Actually Good for You)
Here’s something cool about frozen yogurt bites – they’re genuinely healthy compared to most frozen treats. Greek yogurt packs protein, probiotics, and calcium. Add fresh fruit, and you’re getting vitamins and antioxidants too.
Each bite typically contains:
- 3-4 grams of protein (thanks to that Greek yogurt)
- Probiotics for gut health
- Natural sugars instead of processed ones (if you use honey or maple syrup)
- Lower calories than most ice cream treats
Not saying they’re a health food, but they’re definitely a smarter choice when you want something sweet and cold.
Storage and Serving Tips for Maximum Enjoyment
Your frozen yogurt bites will keep in the freezer for up to three months, but honestly, they never last that long in my house. Here’s how to store them properly:
Transfer them to an airtight container once they’re completely frozen. Layer them with parchment paper if you’re stacking them to prevent sticking.
For serving, let them sit out for 2-3 minutes if you prefer a softer texture, or eat them straight from the freezer if you like them super firm. Both ways are delicious – it’s just personal preference.
Pro tip: Make double batches. Seriously. You’ll thank me later when you’re not scrambling to make more because you demolished the first batch in two days.
Final Thoughts: Why This Recipe Will Change Your Summer Game
Look, I’ve tried a lot of frozen treat recipes over the years, and these frozen yogurt bites consistently deliver. They’re simple enough for a Tuesday afternoon craving but impressive enough to serve at a summer barbecue.
The best part? You can customize them endlessly. Feeling tropical? Add coconut and pineapple. Want something indulgent? Go chocolate and peanut butter. Health kick mode? Stick with berries and a drizzle of honey.
These little frozen gems have become my go-to solution for hot days, unexpected guests, and those moments when you need something sweet but don’t want to feel terrible about it afterward. Give them a try – I’m betting they’ll become a regular in your freezer rotation too.
