
There’s something truly magical about pulling a fresh loaf of sourdough bread from the oven. That crackling crust, the tantalizing aroma, the anticipation of that first slice… but what if we could make it even better? Enter this Blueberry Lemon Sourdough Bread – a gorgeous, flavor-packed twist on traditional sourdough that combines tangy fermentation with sweet blueberries and bright citrus notes.
Have you ever bitten into a slice of sourdough bread and thought, “This could use some fruity sweetness”? Well, I certainly have! According to a recent baking trend report, fruit-infused sourdough breads have seen a 35% increase in popularity since 2022, and it’s easy to see why. The natural tanginess of sourdough creates the perfect canvas for sweet-tart flavor additions.
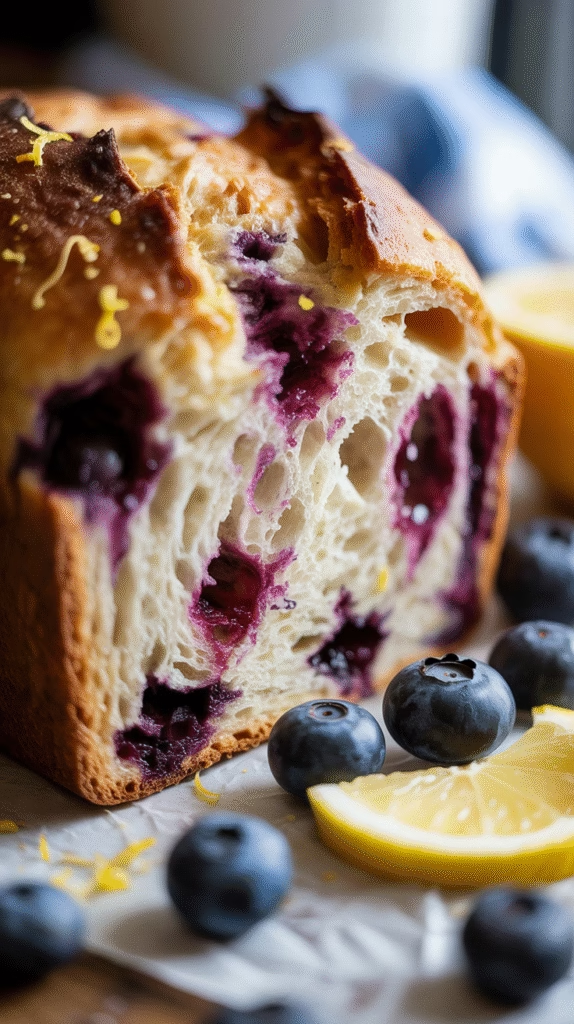
Whether you’re a sourdough veteran looking to experiment or a newbie ready to impress, this recipe will guide you through creating a showstopper loaf that’s as beautiful as it is delicious. The purple-streaked crumb studded with bursts of blueberry and flecks of yellow zest isn’t just Instagram-worthy – it’s a flavor revelation!
What Makes Blueberry Lemon Sourdough Special
Traditional sourdough bread already brings incredible depth and character to the table with its complex fermented flavors. When you introduce blueberries and lemon to this equation, something truly magical happens. The natural acidity of the sourdough perfectly complements the sweet-tart profile of blueberries, while the bright, aromatic lemon zest cuts through with a citrusy punch that keeps each bite interesting.
This isn’t just a flavor win – it’s nutritionally superior too! Sourdough’s fermentation process makes nutrients more bioavailable and easier to digest, while blueberries bring their famous antioxidant properties to the party. One slice delivers both probiotic benefits and berry goodness.
The history of fruit-infused artisanal breads dates back centuries, but modern bakers have been rediscovering these combinations with renewed enthusiasm. What was once considered peasant food – using whatever seasonal ingredients were available – has become a sought-after specialty that showcases both technical skill and flavor creativity.
When you slice into this loaf, prepare to be amazed by the beautiful purple-streaked crumb, bright pops of whole berries, and the sunny yellow specks of lemon zest distributed throughout. It’s a feast for the eyes before it even reaches your taste buds!
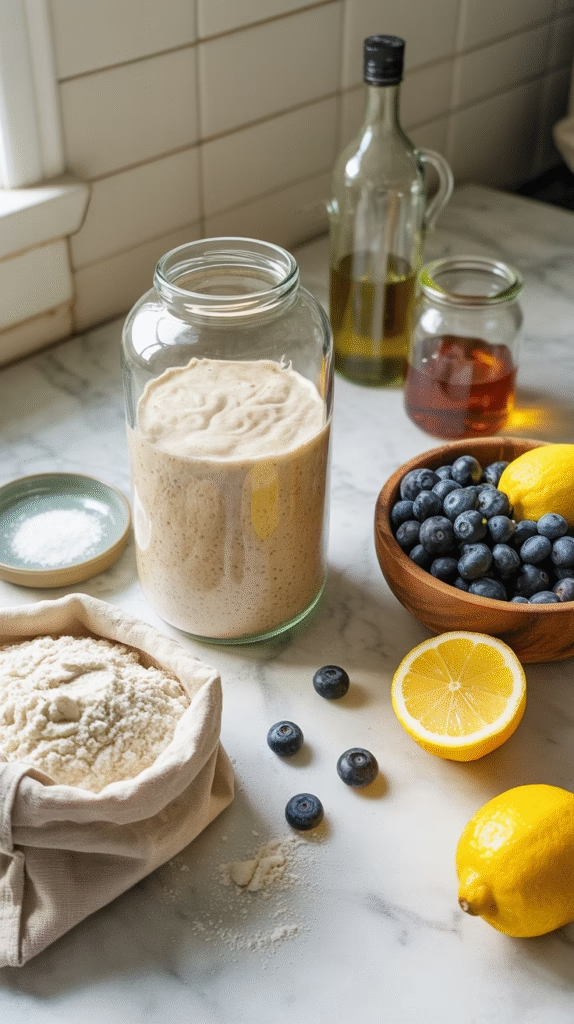
Essential Ingredients for Blueberry Lemon Sourdough
To create this spectacular loaf, you’ll need:
- 100g active sourdough starter (100% hydration)
- 400g bread flour
- 50g whole wheat flour
- 325g filtered water (adjust ±15g depending on flour absorption)
- 9g salt
- 1 cup fresh or frozen blueberries (about 150g)
- Zest of 2 medium lemons (about 2 tablespoons)
- 1 tablespoon honey (optional, helps with browning and subtle sweetness)
The quality of your ingredients makes a significant difference in the final loaf. For the flour, bread flour with a protein content of at least 12% will give you the best structure to support the weight of the berries. The whole wheat flour adds nutty complexity and helps balance the sweetness of the fruit.
When it comes to blueberries, both fresh and frozen work wonderfully, but they behave differently in the dough. Fresh berries maintain their integrity better during mixing, while frozen berries tend to release more juice and create more pronounced purple streaking. If using frozen, don’t thaw them before adding to the dough – add them still frozen during the final stretch and folds.
For the lemon zest, organic lemons are ideal since you’re using the outer peel. Be sure to zest only the yellow part, avoiding the bitter white pith beneath. A microplane grater makes this job much easier and produces finer zest that distributes more evenly throughout the dough.
The honey is optional but recommended – it adds a subtle floral sweetness that complements both the blueberries and lemon, while also promoting better crust browning thanks to the additional sugars.
Equipment You’ll Need
Successful sourdough baking relies on having the right tools. Here’s what you’ll need:
- Dutch oven or combo cooker (for creating steam during baking)
- Digital kitchen scale (precision matters in sourdough!)
- Banneton or proofing basket (9-10 inch round or oval)
- Bread lame or sharp razor for scoring
- Parchment paper
- Large mixing bowl
- Dough scraper (both bench and bowl scrapers are helpful)
- Microplane or zester for the lemon
Don’t worry if you don’t have specialized equipment – there are budget-friendly alternatives. Instead of a banneton, you can use a bowl lined with a well-floured kitchen towel. No Dutch oven? A baking stone or steel with a heat-safe bowl inverted over the dough can create a similar steam environment.
The right equipment impacts your final results significantly. The Dutch oven traps steam during the initial baking phase, which allows for maximum oven spring and that coveted crackling crust. Similarly, a banneton helps maintain the dough’s shape during proofing, leading to a taller, more open-crumbed loaf.
Preparing Your Sourdough Starter
Before diving into this recipe, ensure your starter is active and vibrant. Feed it 8-12 hours before you plan to mix your dough, aiming for 100% hydration (equal parts flour and water by weight).
Your starter should be at peak activity when you use it – doubled or tripled in volume with a bubbly surface and a pleasant, sweet-sour aroma. A good test is the float test: drop a small piece of starter into water; if it floats, it’s ready to use.
Timing your starter feeding schedule is crucial. I find feeding my starter the night before I plan to mix my dough works perfectly. By morning, it’s usually at peak activity and ready to go. In warmer weather, you might need to adjust this timeline as fermentation happens more quickly.
If your starter isn’t quite as active as you’d like, try giving it a couple of feedings 12 hours apart before beginning this recipe. A sluggish starter will result in longer fermentation times and potentially less rise in your final loaf.
Step-by-Step Mixing Process
- Create the base dough: In a large bowl, combine the water and starter, whisking until the starter is fully dissolved. Add the flours and mix until no dry bits remain. Cover and let rest for 30 minutes – this autolyse period allows the flour to fully hydrate and begins gluten development.
- Add salt and honey: After the autolyse, sprinkle the salt over the dough and drizzle with honey if using. With wet hands, use the pinching method to incorporate these ingredients thoroughly, then perform a series of stretch and folds in the bowl until the dough feels stronger.
- First and second stretch and folds: Allow the dough to rest for 30 minutes, then perform your first set of stretch and folds. Rest another 30 minutes and repeat. The dough should be noticeably stronger after these first two sets.
- Incorporate lemon zest: During the third set of stretch and folds, sprinkle the lemon zest evenly over the dough as you stretch it out. Fold as usual, working to distribute the zest throughout the dough. Let rest another 30 minutes.
- Add blueberries: For the fourth and final set of stretch and folds, gently press the blueberries into the stretched-out dough, distributing them as evenly as possible. Fold the dough very gently to avoid crushing the berries. Some will break – that’s normal and creates those beautiful purple streaks!
The key to this mixing process is gentle handling, especially after adding the blueberries. You want to develop enough strength in the dough before adding them, but avoid overworking the dough afterward. Don’t worry if your dough seems wetter after adding the berries – they release moisture as they warm in the dough.
A well-mixed dough should pass the windowpane test (though this is trickier with berries included). When you gently stretch a small piece of dough, it should become translucent without tearing – a sign that your gluten is well-developed.
Mastering the Bulk Fermentation
After your final set of stretch and folds with the blueberries incorporated, it’s time for bulk fermentation – perhaps the most crucial step in sourdough baking.
Cover your dough and place it in a warm spot, ideally around 75-78°F (24-26°C). The bulk fermentation will take approximately 4-6 hours, depending on your ambient temperature and starter strength. In warmer conditions, it may take closer to 4 hours; in cooler environments, it might need the full 6 or even longer.
Rather than watching the clock, watch your dough. You’re looking for these visual cues:
- An increase in volume of about 30-50% (not doubled like conventional yeast bread)
- A smoother, more domed surface
- Bubbles visible both on top and along the sides of your container
- A more relaxed, jiggly texture when you gently shake the container
During bulk fermentation, handle the dough minimally to avoid damaging the berries. If your kitchen is particularly cool, you can place the covered dough container in an oven with just the light on, or on top of a running refrigerator to provide gentle warmth.
Remember that seasonal changes greatly affect fermentation times. In summer, keep a closer eye on your dough as it will ferment faster; in winter, be prepared for a longer bulk fermentation period. Patience is key – under-fermented dough will yield a dense, gummy loaf, while over-fermented dough will be difficult to shape and may collapse in the oven.
Shaping Your Blueberry Lemon Loaf
When your dough has completed bulk fermentation, it’s time to shape. This step requires a gentle touch to preserve the integrity of the berries while creating necessary surface tension.
- Prepare your work surface with a light dusting of flour. Turn out your dough gently, being careful not to degas it completely.
- With floured hands, perform a gentle pre-shape by folding the edges toward the center to create a round. Let the dough rest for 20-30 minutes, covered with a kitchen towel. This bench rest allows the gluten to relax before final shaping.
- For the final shape, use a light touch to create tension across the surface of the dough. For a boule (round loaf), gently cup your hands around the dough and pull it toward you on an unfloured section of counter to create tension. For a batard (oval loaf), fold the dough like an envelope, then roll and seal the seam.
- To prevent a soggy bottom from berry juice, dust your banneton with a mixture of rice flour and all-purpose flour (about 50/50). The rice flour creates a more effective barrier against moisture.
- Carefully transfer your shaped dough to the banneton, seam side up. The smooth surface will become the top of your loaf after turning out for baking.
Common shaping mistakes include handling the dough too roughly (which crushes berries) or not creating enough surface tension (which results in a flat loaf). Remember that this dough will be slightly wetter and more delicate than a standard sourdough because of the moisture from the berries.
Scoring and Baking to Perfection
When you’re ready to bake, preheat your oven to 500°F (260°C) with your Dutch oven inside for at least 45 minutes. You want everything blazing hot to promote maximum oven spring.
Prepare a piece of parchment paper large enough to serve as a sling for transferring your dough. When the oven is preheated, carefully remove your dough from the refrigerator and turn it out onto the parchment. The cold dough should release cleanly from a well-floured banneton.
Scoring this loaf requires special consideration due to the berries. A simple yet effective pattern is a slightly off-center slash about ¼ inch deep, or a gentle curved “C” shape. Avoid very deep scores that might expose too many berries, which can burn during baking. Work quickly with a very sharp lame or razor blade – the colder the dough, the cleaner your score will be.
Carefully transfer the dough on its parchment sling to the preheated Dutch oven. Cover with the lid and place in the oven. Immediately reduce the temperature to 450°F (230°C) and bake covered for 20 minutes. This initial covered period creates steam for optimal oven spring and crust development.
After 20 minutes, remove the lid and continue baking for an additional 20-25 minutes until the crust is a deep golden brown. Don’t be afraid of good color – a well-developed crust contributes significantly to flavor.
To check for doneness, look for these signs:
- A hollow sound when tapping the bottom
- An internal temperature of at least 205°F (96°C)
- A firm, stable feel to the loaf when picked up
- A fully colored crust with caramelized edges where berries may have broken through
If needed, you can leave the loaf in the turned-off oven with the door cracked for an additional 5-10 minutes to ensure the crust is completely set.
Serving Suggestions and Pairings
This blueberry lemon sourdough shines in so many settings! Here are some delicious ways to enjoy it:
For breakfast or brunch:
- Lightly toasted with a smear of honey butter
- Served alongside Greek yogurt and additional fresh berries
- Made into French toast for an exceptional weekend treat
- Topped with ricotta and a drizzle of honey
For afternoon tea or coffee:
- Served with lemon curd for an intensive citrus experience
- Paired with mascarpone or cream cheese for a cheesecake-like treat
- Enjoyed plain with a cup of Earl Grey tea (the bergamot complements the lemon beautifully)
For more savory applications:
- Used as a base for a turkey sandwich with herbed mayonnaise
- Served alongside a summer salad with goat cheese
- Paired with a mild cheese plate featuring soft brie or chèvre
This bread makes an exceptional addition to a summer picnic basket, particularly paired with charcuterie, cheeses, and sparkling beverages. The hint of sweetness and brightness from the lemon makes it more versatile than you might initially expect!
Troubleshooting Common Issues
Even experienced bakers encounter challenges with specialty loaves. Here are solutions to common problems:
Gummy interior despite proper baking time:
- Ensure your bread is completely cooled before slicing
- Consider reducing hydration by 15-20g in your next batch
- Check that your bulk fermentation was adequate – underfermented dough often yields gummy results
- Make sure your oven is properly calibrated with an oven thermometer
Berries sink to the bottom of the loaf:
- Make sure your dough has proper strength before adding berries
- Consider using frozen berries which release less moisture immediately
- Distribute berries more carefully during final shaping
- Ensure adequate gluten development before adding fruit
Excessive purple bleeding throughout the dough:
- Use fresh rather than frozen berries for less bleeding
- Add berries later in the process, during final shaping
- Embrace the color! It’s part of the charm of fruit bread
Dough too wet to handle after adding berries:
- Reduce the overall hydration in your next batch by 5-10%
- Use a higher percentage of bread flour for more structure
- Make sure your starter is at peak activity for maximum strength
- Consider lowering the quantity of berries slightly
Adjustments for high humidity or different elevations:
- In humid environments, reduce water by 15-20g
- At high altitude, increase hydration slightly and extend fermentation time
- Consider adding an extra set of stretch and folds for additional strength
Remember that each loaf is a learning experience. Take notes on what works and what doesn’t in your specific kitchen environment. With each bake, you’ll gain more intuition about how the dough should feel and behave.
Conclusion
There you have it – a beautiful loaf of blueberry lemon sourdough bread that’s truly worth the time and effort! The combination of tangy sourdough, sweet blueberries, and bright lemon creates a flavor profile that’s hard to beat. The purple-tinged crumb studded with bursts of berry and flecks of yellow zest makes each slice a visual delight as well.
Don’t be surprised if this becomes your new favorite bread to bake when blueberries are in season. It’s special enough for weekend brunches but simple enough to make regularly once you’ve mastered the technique. Your friends and family will be amazed at both your baking skills and the unique flavor combination.
Remember that sourdough baking is part science, part art, and entirely worth mastering. Each loaf gets better as you learn the feel of the dough and the rhythm of fermentation. So grab your starter, some fresh blueberries, and a lemon or two – your taste buds will thank you!
