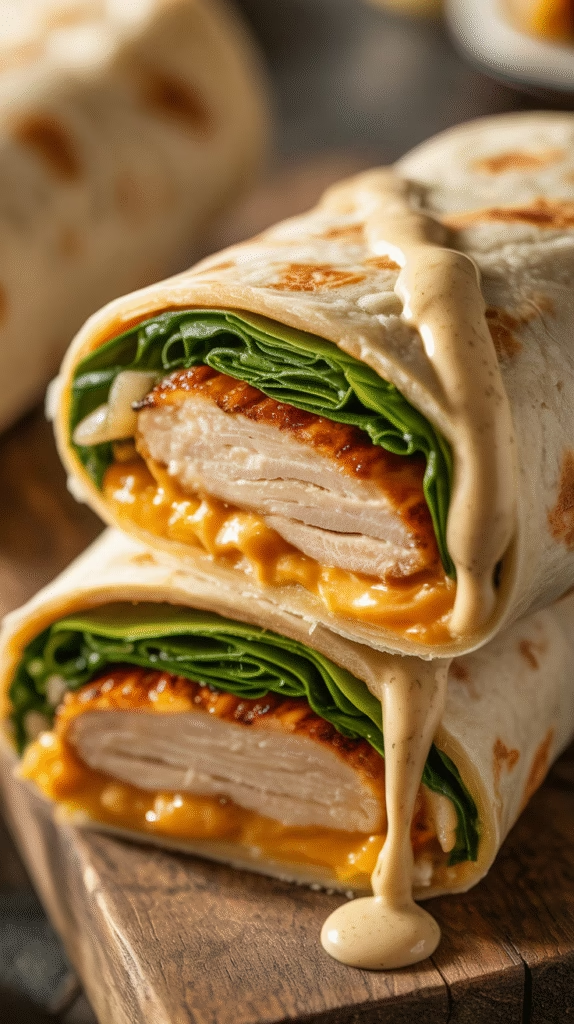
You know that moment when you bite into something so ridiculously good that you actually pause mid-chew? That’s exactly what happened to me the first time I made this cheesy garlic chicken wrap. I’m not being dramatic here—this thing is a straight-up game changer.
I stumbled onto this recipe during one of those “what’s in my fridge” moments we all have. You know the drill: random chicken breast, some tortillas hanging around, and a serious craving for something that would make my taste buds do a happy dance. What I ended up with was pure magic wrapped in a tortilla.
Why This Cheesy Garlic Chicken Wrap Rules Your Kitchen
Look, I’ve tried a lot of wrap recipes in my day, and most of them are about as exciting as watching paint dry. But this one? It’s got everything you want and didn’t know you needed.
The garlic butter situation alone will have your neighbors wondering what smells so incredible. And when you combine that with perfectly seasoned chicken and cheese that gets all melty and gorgeous? Game over.
Here’s what makes this wrap special:
- Garlic butter that actually tastes like garlic (shocking concept, right?)
- Chicken that stays juicy instead of turning into cardboard
- Cheese blend that melts like a dream
- Veggies that add crunch without being boring
- Assembly that won’t fall apart the second you pick it up
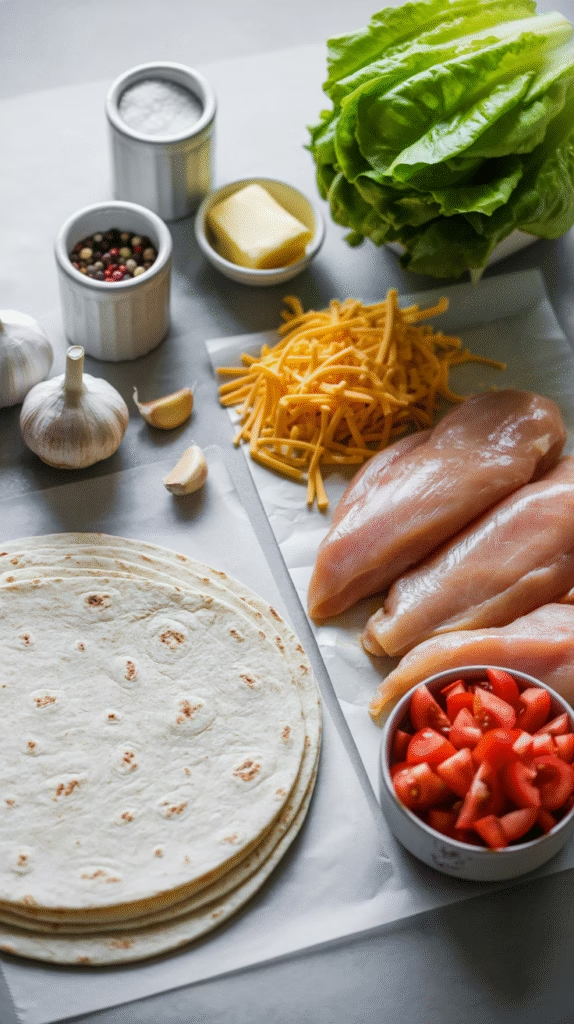
Gathering Your Wrap Arsenal
Before we get cooking, let’s talk ingredients. I’m not going to lie and say you need fancy stuff—this is comfort food, not molecular gastronomy.
For the Chicken:
- 2 large chicken breasts (about 1 pound)
- 2 tablespoons olive oil
- 1 teaspoon garlic powder
- 1 teaspoon paprika
- 1/2 teaspoon black pepper
- 1/2 teaspoon salt
- 1/4 teaspoon cayenne pepper (optional, but why not live dangerously?)
For the Garlic Butter:
- 4 tablespoons butter (real butter, people—this isn’t the time for substitutes)
- 4 cloves fresh garlic, minced
- 1 tablespoon fresh parsley, chopped
- Pinch of salt
For Assembly:
- 4 large flour tortillas
- 1 cup shredded mozzarella cheese
- 1/2 cup shredded cheddar cheese
- 1 cup lettuce, chopped
- 1 medium tomato, diced
- 1/4 red onion, sliced thin
- 1/4 cup ranch dressing (or whatever makes you happy)
Cooking the Chicken Like a Pro
Here’s where most people mess up chicken—they turn it into shoe leather. But we’re not doing that because I’m about to share the secret that changed my chicken game forever.
Step 1: Prep Your Chicken Pound those chicken breasts to about 3/4 inch thickness. Trust me on this—even cooking is your friend. Season both sides with all your spices and let it sit for about 10 minutes. The chicken needs time to think about what it’s about to become.
Step 2: Heat and Sear Heat your olive oil in a large skillet over medium-high heat. When it shimmers (that’s your cue), add the chicken. Here’s the crucial part: don’t touch it for 6-7 minutes. I know it’s tempting to poke and prod, but resist the urge.
Step 3: Flip and Finish Flip once and cook another 5-6 minutes until the internal temp hits 165°F. Remove from heat and let it rest for 5 minutes before slicing. Resting isn’t just for dramatic effect—it keeps all those juices locked in.
Creating Garlic Butter That Dreams Are Made Of
While your chicken is doing its resting thing, let’s make this garlic butter that’ll have you questioning every other garlic butter you’ve ever had.
Melt the butter in a small saucepan over low heat. Add your minced garlic and cook for about 2 minutes until fragrant. You’ll know it’s ready when your kitchen smells like heaven had a baby with an Italian restaurant 🙂
Stir in the parsley and salt, then remove from heat. This stuff is liquid gold, FYI—you might want to make extra because you’ll be putting it on everything.
Assembly Time: Where the Magic Happens
Ever wonder why restaurant wraps always seem to hold together better than yours? It’s all about the technique, and I’m about to spill the secrets.
Step 1: Warm Your Tortillas Heat each tortilla in a dry skillet for about 30 seconds per side. Warm tortillas are more pliable and less likely to crack when you roll them up. Cold tortillas are the enemy of good wraps everywhere.
Step 2: Brush with Garlic Butter Brush each warm tortilla with that gorgeous garlic butter. Don’t be shy—this is where flavor lives.
Step 3: Add Your Cheese Base Sprinkle both cheeses down the center of each tortilla, leaving about 2 inches on each end. The cheese acts like edible glue, so this step is crucial for structural integrity.
Step 4: Layer Like You Mean It Add your sliced chicken, lettuce, tomatoes, and onions. Here’s a pro tip: keep your wet ingredients away from the tortilla edges. Nobody wants a soggy wrap situation.
Step 5: The Roll Fold in the sides first, then roll from bottom to top, keeping everything tight but not so tight that you squeeze out all the good stuff. It’s like swaddling a delicious baby.
Pro Tips That’ll Make You Look Like a Wrap Genius
After making these wraps approximately 847 times (okay, maybe not that many, but close), I’ve learned a few tricks that separate the amateurs from the wrap masters.
The Cheese Trick
Mix your mozzarella and cheddar before adding them to the wrap. The mozzarella gives you that Instagram-worthy cheese pull, while the cheddar brings the flavor. It’s a partnership made in dairy heaven.
The Veggie Game
Pat your tomatoes dry with paper towels before adding them. Wet tomatoes are wrap killers—they’ll turn your beautiful creation into a soggy mess faster than you can say “cheesy garlic chicken.”
The Temperature Factor
Room temperature ingredients roll better than cold ones. Pull your cheese and veggies out of the fridge about 15 minutes before assembly. Your wraps will thank you.
The Toasting Option
Want to take things up a notch? After rolling, brush the outside of your wrap with a little more garlic butter and toast it in a skillet for 2-3 minutes per side. Crispy exterior, melty interior—you’re welcome.
Variations Because Variety Is the Spice of Life
Don’t get me wrong—the original version is perfection. But sometimes you want to shake things up, right?
The Spicy Version
Add sliced jalapeños and a drizzle of hot sauce. Replace the ranch with chipotle mayo, and boom—you’ve got heat.
The Mediterranean Twist
Swap the ranch for tzatziki, add some cucumber and red peppers, and throw in some feta cheese. It’s like a vacation in wrap form.
The Bacon Addition
Because everything’s better with bacon, IMO. Cook up 4-6 strips and crumble them over the chicken. Your arteries might not thank you, but your taste buds will.
Storage and Reheating Without Ruining Everything
Let’s be real—sometimes you make too many wraps. It happens to the best of us. Here’s how to store them without ending up with cardboard the next day.
For Short-Term Storage: Wrap each one individually in foil or plastic wrap and refrigerate for up to 2 days. When you’re ready to eat, let it come to room temperature for about 10 minutes, then unwrap and enjoy cold or lightly toasted.
For Reheating: Skip the microwave—it’ll make everything soggy and sad. Instead, wrap in foil and warm in a 350°F oven for about 10 minutes, or toast in a skillet over medium heat for 2-3 minutes per side.
The Nutritional Real Talk
Look, this isn’t health food, but it’s not terrible either. You’ve got protein from the chicken, calcium from the cheese, and vitamins from the veggies. The garlic butter? Well, garlic has antioxidants, so there’s that 🙂
Each wrap comes in around 450-500 calories, depending on how generous you are with the cheese (and let’s be honest, you should be generous with the cheese).
Why This Recipe Will Become Your Go-To
Here’s the thing about this cheesy garlic chicken wrap—it’s reliable. When you need something that’ll actually taste good, come together quickly, and satisfy that comfort food craving, this is your answer.
I’ve made these for picky kids, skeptical spouses, and friends who claim they “don’t really like wraps.” Guess what? They all became converts. There’s something about that combination of garlic butter, melted cheese, and perfectly seasoned chicken that just works.
The best part? You probably have most of these ingredients sitting in your kitchen right now. No special trips to fancy stores, no weird ingredients you’ll use once and then wonder why you bought them.
Your New Favorite Lunch Has Arrived
So there you have it—the cheesy garlic chicken wrap that’s about to become your new obsession. It’s comfort food that doesn’t require a three-hour commitment, weeknight dinner that doesn’t suck, and impressive enough to serve when you want to look like you know what you’re doing in the kitchen.
Trust me, make these once and you’ll understand why I get so excited about a simple wrap. Sometimes the best recipes are the ones that take ordinary ingredients and turn them into something extraordinary. This is one of those recipes.
Now stop reading and go make one. Your taste buds have been patient long enough.