
Let’s be honest—nothing beats the smell of chicken parmesan bubbling away in your oven on a Tuesday night. You know that moment when the cheese starts getting all golden and bubbly, and your neighbors start mysteriously appearing at your door? Yeah, that’s the magic we’re talking about here.
I’ve been perfecting my chicken parm game for years, and trust me, I’ve made every mistake in the book. Soggy breading? Been there. Rubbery chicken? Done that. But after countless kitchen disasters (and a few kitchen victories), I’ve cracked the code to restaurant-quality chicken parmesan that’ll have your family begging for the recipe.
Why This Chicken Parmesan Recipe Actually Works
Here’s the thing about chicken parm—everyone thinks they can just slap some breadcrumbs on chicken and call it a day. But the secret lies in the technique, not just the ingredients. This recipe focuses on three crucial elements that most people mess up:
The Perfect Breading Station: You need three distinct stops—flour, beaten eggs, and seasoned breadcrumbs. No shortcuts here, folks.
Temperature Control: Ever wonder why restaurant chicken parm tastes so much better? They nail the cooking temperature every single time.
Cheese Strategy: Not all mozzarella is created equal, and timing your cheese application makes all the difference.
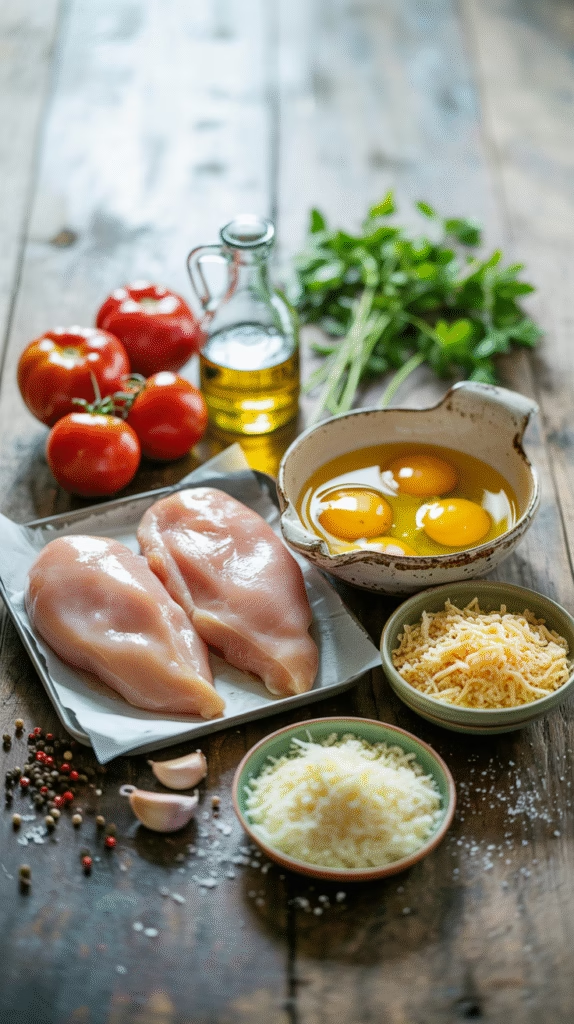
Ingredients That Make the Magic Happen
For the Chicken:
- 4 boneless, skinless chicken breasts (about 6-8 oz each)
- 1 cup all-purpose flour
- 3 large eggs, beaten
- 2 cups Italian-seasoned breadcrumbs
- 1/2 cup grated Parmesan cheese
- 1 teaspoon garlic powder
- 1 teaspoon Italian seasoning
- Salt and black pepper to taste
- 1/2 cup vegetable oil for frying
For the Assembly:
- 2 cups marinara sauce (homemade or high-quality jarred)
- 2 cups shredded mozzarella cheese
- 1/2 cup grated Parmesan cheese
- Fresh basil leaves for garnish
- 1 pound spaghetti or your favorite pasta
Pro tip: Don’t cheap out on the mozzarella. Get the good stuff—low-moisture, whole milk mozzarella melts like a dream and doesn’t turn your dish into a watery mess.
Step-by-Step Instructions That Actually Work
Prep Your Chicken Like a Pro
First things first—we need to get these chicken breasts ready for their close-up. Place each breast between plastic wrap and gently pound them to about 3/4-inch thickness. This isn’t anger management therapy (though it’s surprisingly therapeutic :)), it’s about ensuring even cooking.
Season both sides with salt and pepper. Let them sit for about 10 minutes while you set up your breading station. This little rest period helps the seasoning penetrate the meat.
Set Up Your Breading Assembly Line
Here’s where most people go wrong—they rush this part. Set up three shallow dishes in order:
- Flour Station: Mix flour with a pinch of salt and pepper
- Egg Station: Beat eggs until smooth (add a tablespoon of water for extra binding power)
- Breadcrumb Station: Combine breadcrumbs, grated Parmesan, garlic powder, and Italian seasoning
The Golden Rule: Keep one hand for wet ingredients and one for dry. Trust me on this—you’ll thank me when you’re not scraping cement-like coating off your fingers.
The Breading Process That Changes Everything
Dredge each piece of chicken through the flour, shaking off excess. Then dip into the beaten eggs, letting any excess drip off. Finally, press firmly into the breadcrumb mixture, making sure both sides are completely coated.
Here’s my secret weapon: after breading, let the chicken rest on a wire rack for 15-20 minutes. This helps the coating adhere better and prevents it from falling off during cooking. FYI, this step separates amateur hour from restaurant-quality results.
Cooking Techniques That Make the Difference
Pan-Frying for That Perfect Crust
Heat vegetable oil in a large skillet over medium-high heat. You want about 1/4 inch of oil—enough to create a proper sear without deep frying.
Test the oil temperature by dropping in a small piece of breadcrumb mixture. It should sizzle immediately but not violently. Cook the chicken for 3-4 minutes per side until golden brown and the internal temperature reaches 165°F.
Critical mistake to avoid: Don’t overcrowd the pan. Cook in batches if necessary. Overcrowding drops the oil temperature and results in soggy, greasy chicken.
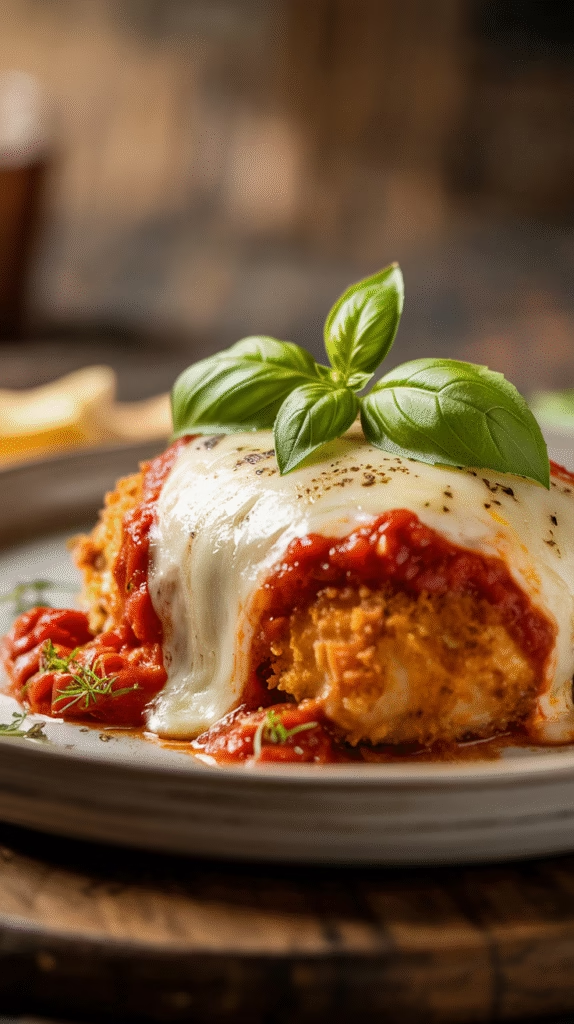
The Oven Assembly Magic
Preheat your oven to 425°F. Spread a thin layer of marinara sauce in a 9×13 baking dish. Place the pan-fried chicken on top, then spoon more sauce over each piece.
Now for the cheese strategy: sprinkle mozzarella generously over each piece, then add a final dusting of Parmesan. This double-cheese approach creates layers of flavor that’ll make your taste buds do a happy dance.
Timing and Temperature Secrets
Bake for 15-20 minutes until the cheese is melted and bubbly with golden spots. The internal temperature should maintain 165°F—don’t overcook or you’ll end up with chicken jerky.
Meanwhile, cook your pasta according to package directions. IMO, spaghetti is classic, but penne or rigatoni work great too if you want something that holds the sauce better.
Pro Tips That Separate Good from Great
Make-Ahead Magic
You can bread the chicken up to 24 hours in advance. Just place breaded pieces on a parchment-lined baking sheet, cover with plastic wrap, and refrigerate. This actually improves the coating adhesion.
Sauce Selection Strategy
Not all marinara sauces are created equal. Look for ones with minimal sugar content—you want the tomato flavor to shine, not compete with candy-like sweetness. Or better yet, make your own with canned San Marzano tomatoes.
Cheese Combinations That Work
While mozzarella is non-negotiable, experiment with adding a bit of provolone or fontina to the mix. These cheeses add complexity without overwhelming the dish.
Common Mistakes and How to Avoid Them
The Soggy Bottom Syndrome
Ever cut into your chicken parm only to find the bottom coating turned to mush? This happens when sauce seeps under the chicken. Solution: pat the chicken completely dry after pan-frying and use just enough sauce to coat, not drown.
Overcooked Chicken Drama
Chicken continues cooking in the oven, so don’t go crazy with the initial pan-frying. A light golden color is perfect—the oven will finish the job.
Cheese Catastrophes
Adding cheese too early results in burnt, bitter flavors. Wait until the last 15-20 minutes of baking to add your cheese layers.
Serving Suggestions That Complete the Experience
Serve over al dente pasta with extra marinara on the side. A simple side salad with Italian dressing cuts through the richness perfectly. And here’s a controversial opinion: garlic bread is optional. The dish is rich enough without it, but hey, I won’t judge if you go for it anyway.
Fresh basil leaves aren’t just garnish—they add a bright, aromatic finish that balances all that cheese and sauce. Don’t skip this step.
Storage and Reheating Wisdom
Leftover chicken parm keeps in the fridge for 3-4 days. For reheating, skip the microwave (unless you enjoy rubbery chicken) and use a 350°F oven for 15-20 minutes. Cover with foil to prevent the cheese from over-browning.
You can also freeze assembled but unbaked chicken parm for up to 3 months. Just add an extra 10-15 minutes to the baking time when cooking from frozen.
Why This Recipe Works Better Than Others
Look, I’ve tried probably fifty different chicken parmesan recipes over the years. Some were too complicated, others too bland, and many just plain didn’t work. This version strikes the perfect balance between authentic flavor and home kitchen reality.
The pan-frying step ensures a crispy exterior that stays crispy, even under all that sauce and cheese. The double-breading technique creates layers of texture that make each bite interesting. And the cheese strategy? Well, let’s just say it’s taken years of trial and error to get this right.
Final Thoughts on Chicken Parm Perfection
At the end of the day, chicken parmesan isn’t just about following a recipe—it’s about creating an experience. It’s about that moment when you cut into perfectly cooked chicken and hear that satisfying crunch of the coating. It’s about the way the cheese stretches when you take a bite, and how your kitchen smells like an Italian grandmother’s been cooking all day.
Sure, you could order takeout, but where’s the fun in that? Plus, homemade chicken parm lets you control every element, from the quality of ingredients to the amount of cheese (which, let’s be honest, is always “more” in my book).
So grab your apron, crank up some good music, and get ready to make the kind of chicken parmesan that becomes family legend. Trust me, once you nail this recipe, you’ll never want to order it from a restaurant again. And honestly? Your version will probably be better anyway 🙂
