
Protein at breakfast cuts hunger by 40% according to recent studies. Looking for a delicious way to get more protein in the morning? These protein waffles are your answer!
I stumbled upon this recipe by accident when trying to use up extra protein powder. Now it’s my family’s most-requested weekend breakfast! These waffles are fluffy, crispy, and packed with nutrition, without tasting “healthy.” Let me show you how easy they are to make.
What Makes These Protein Waffles Special
- Ready in just 15 minutes
- 20g protein per serving
- Crispy outside, fluffy inside
- Easy to customize
- Freezer-friendly
- Kid-approved taste
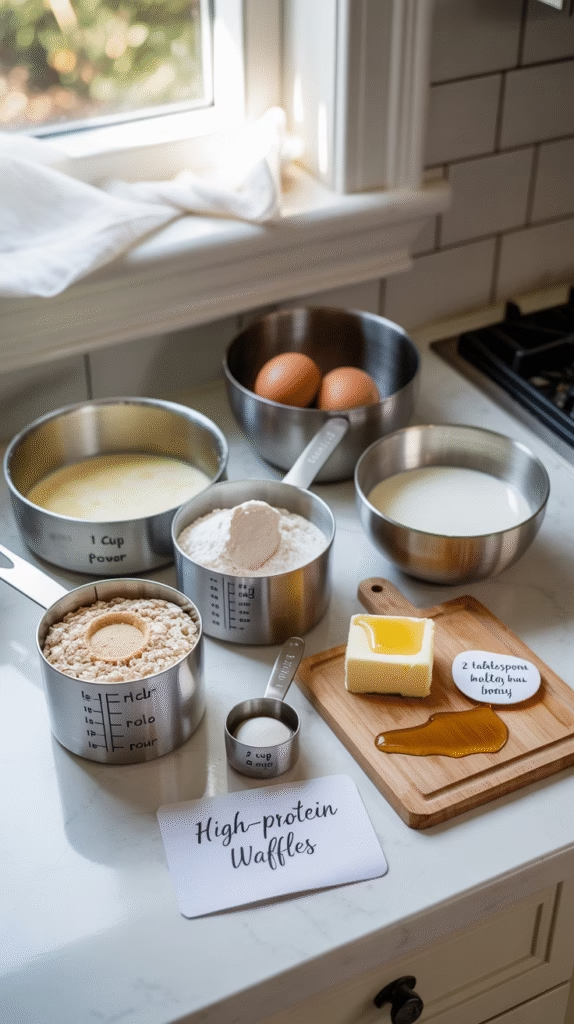
Simple Ingredients You Need
- 1 cup flour (all-purpose or whole wheat)
- 2 scoops (50g) protein powder (vanilla works best)
- 1 teaspoon baking powder
- ½ teaspoon baking soda
- Pinch of salt
- 2 eggs
- 1 cup milk
- 2 tablespoons Greek yogurt
- 1 tablespoon honey
- 1 teaspoon vanilla
- 2 tablespoons melted butter or coconut oil
Don’t have protein powder? You can use 3 tablespoons of Greek yogurt instead, though your protein content will be slightly lower.
Need to make them dairy-free? Any plant milk works great, and plant-based protein powder keeps these waffles completely dairy-free.

How to Make Protein Waffles in 4 Easy Steps
- Mix dry ingredients. Whisk flour, protein powder, baking powder, baking soda, and salt in a large bowl.
- Mix wet ingredients. In another bowl, beat eggs, milk, yogurt, honey, vanilla, and melted butter until smooth.
- Combine & rest. Pour wet ingredients into dry and stir just until combined. A few lumps are fine! Let the batter rest for 5 minutes while your waffle iron heats up.
- Cook. Spray waffle iron with cooking spray. Pour about ½ cup batter (amount depends on your waffle maker size) and cook until golden and crispy, about 3-5 minutes.
That’s it! Top with your favorite toppings and enjoy.
Waffle Success Tips
- Don’t overmix the batter. Stop stirring when you still see a few small lumps – this keeps your waffles tender.
- Let the batter rest. Just 5 minutes helps the baking powder activate and gives you fluffier waffles.
- Wait for the steam to slow down. When the steam coming from your waffle maker slows, your waffles are probably done.
- Keep waffles warm in a 200°F oven if making a big batch.
5 Delicious Variations to Try
1. Chocolate Protein Waffles
Add 2 tablespoons cocoa powder to dry ingredients and use chocolate protein powder. Throw in a handful of chocolate chips if you’re feeling wild!
2. Blueberry Protein Waffles
Fold 1 cup fresh or frozen blueberries into the batter just before cooking. The bursts of berry juice make these incredible.
3. Banana Cinnamon Waffles
Mash one ripe banana into the wet ingredients and add 1 teaspoon cinnamon to the dry mix. Tastes like banana bread in waffle form!
4. Peanut Butter Waffles
Add 2 tablespoons peanut butter to the wet ingredients. The slight nuttiness pairs perfectly with maple syrup or jam.
5. Savory Herb Waffles
Skip the sweetener and vanilla, add 1 teaspoon each of garlic powder and dried herbs. Top with an egg and avocado for a savory breakfast.
Quick Nutrition Facts
Per serving (1 large Belgian waffle):
- Calories: 315
- Protein: 20g
- Carbs: 28g
- Fat: 12g
- Fiber: 2g
Compare that to regular waffles with only 8g protein, and you’ll see why these keep you full until lunch!
Top It Right: Waffle Topping Ideas
Healthy Options:
- Fresh berries + Greek yogurt
- Sliced banana + almond butter
- Cinnamon apples + cottage cheese
Sweet Treats:
- Pure maple syrup + butter
- Yogurt + honey + granola
- Nutella + strawberries
High-Protein Additions:
- Greek yogurt mixed with protein powder
- Cottage cheese + cinnamon + honey
- Nut butter + banana
Meal Prep Magic
These waffles are perfect for busy mornings! Here’s how to store them:
Refrigerator: Store in an airtight container for up to 4 days.
Freezer: Cool completely, then freeze in a single layer on a baking sheet. Once frozen, transfer to a freezer bag. They’ll last 3 months.
Reheating: Pop frozen waffles directly in the toaster for the crispiest results. You can microwave them for 30 seconds if you’re really in a hurry.
I make a double batch every Sunday and freeze them. My kids grab them from the freezer and toast them while getting ready for school. So much healthier than store-bought frozen waffles!
Quick Troubleshooting
Waffles sticking? Make sure your iron is hot and well-greased before adding batter.
Waffles not crispy? Your iron might not be hot enough. Also, don’t stack hot waffles – the steam will make them soggy.
Batter too thick? Add milk, 1 tablespoon at a time.
Batter too thin? Add flour, 1 tablespoon at a time.
The Bottom Line
These protein waffles have changed my breakfast game. They’re quick enough for weekdays but special enough for weekend brunches. The protein keeps me full for hours, and I love knowing I’m starting my day with something delicious AND nutritious.
My current favorite is the banana cinnamon version topped with almond butter and a few sliced strawberries. It tastes like dessert but keeps me energized all morning!
What will your favorite topping be? Give these waffles a try this weekend – your breakfast routine will never be the same!
Easy Protein Waffles: Your New Favorite Healthy Breakfast
Course: BreakfastCuisine: AmericanDifficulty: Easy2-3
servings30
minutes40
minutes180
kcal1
hour10
minutesThese protein waffles are the perfect way to kickstart your morning with a boost! Packed with protein, naturally gluten-free (if using oat or almond flour), and freezer-friendly, they’re ideal for meal prep or a quick post-workout breakfast. No protein powder chalkiness—just tasty, nourishing waffles that’ll keep you full for hours.
Ingredients
1 cup rolled oats or oat flour
1 scoop (about 30g) vanilla protein powder (whey or plant-based)
1 tsp baking powder
1/2 tsp cinnamon (optional)
Pinch of salt
2 large eggs
1/2 cup unsweetened almond milk (or milk of choice)
1 ripe banana (mashed)
1 tsp vanilla extract
1 tbsp melted coconut oil or butter (plus more for greasing waffle iron)
Directions
- Preheat your waffle iron and lightly grease it with oil or butter.
- In a blender or mixing bowl, combine oats (or oat flour), protein powder, baking powder, cinnamon, and salt.
- Add eggs, mashed banana, almond milk, vanilla extract, and melted coconut oil. Blend or whisk until smooth and well combined.
- Let the batter rest for 5 minutes to thicken
- Pour the batter into the preheated waffle iron and cook according to your machine’s instructions (usually 3–5 minutes) until golden brown and crisp
- Carefully remove the waffle and repeat with remaining batter.
- Serve warm with your favorite toppings—think Greek yogurt, berries, nut butter, or a drizzle of honey.
Notes
- Want it sweeter? Add 1–2 tsp of maple syrup or honey to the batter.
Make it dairy-free by using a plant-based protein and almond milk.
For a crunchy exterior, cook a little longer on a medium heat setting.
Freezer Tip: Let waffles cool, then freeze individually. Reheat in a toaster for a quick weekday breakfast.
