
Whether you’re a baking beginner or a pie-making professional, this foolproof blueberry pie recipe guarantees a golden, bubbling masterpiece every time. No more soggy bottoms, runny fillings, or tough crusts. By following our step-by-step guide, you’ll create a pie that would make any grandmother proud.
Why This Blueberry Pie Recipe Works
Before we get to the recipe itself, let’s talk about what makes this particular blueberry pie special:
Perfect Balance of Sweet & Tart: Too many recipes err on the side of excessive sweetness, masking the natural flavor of the berries. Our filling strikes the ideal balance, allowing the blueberries’ natural character to shine while providing just enough sweetness.
Flaky, Buttery Crust That Holds Up: The worst disappointment in pie-making is a soggy bottom crust. Our technique ensures a sturdy yet tender pastry that remains crisp even under the juicy filling.
Simple Ingredients, Big Flavor: No need for specialty ingredients or complicated techniques. This recipe uses pantry staples but combines them thoughtfully for maximum impact.
Versatility With Fresh or Frozen Berries: While fresh summer blueberries are unbeatable, this recipe works beautifully with frozen berries too, making it a year-round favorite.
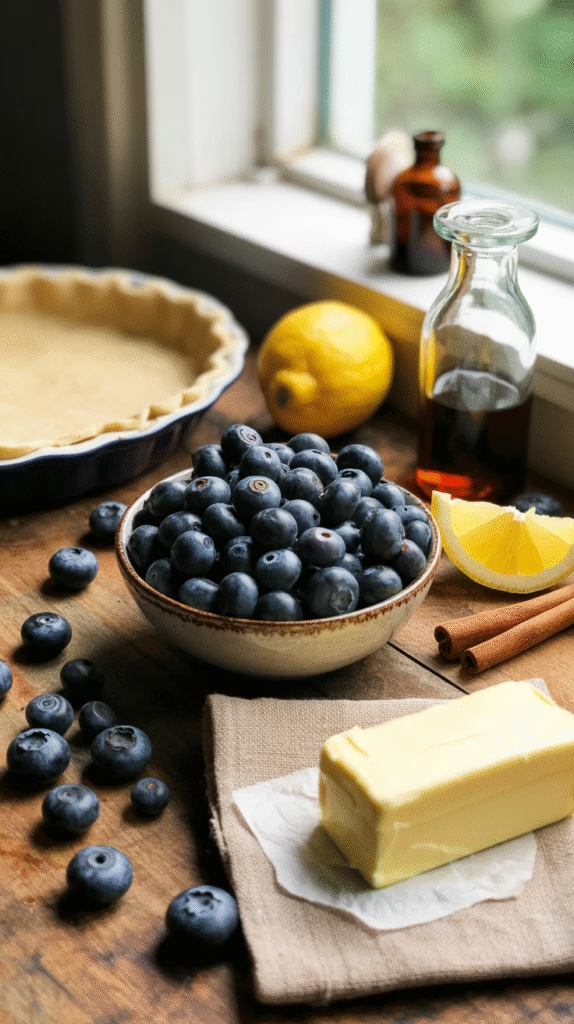
Ingredients You’ll Need
For the Crust (Double Crust for Top and Bottom):
- 2½ cups all-purpose flour
- 1 tablespoon granulated sugar
- 1 teaspoon salt
- 1 cup (2 sticks) cold unsalted butter, cubed
- 6-8 tablespoons ice water
- 1 tablespoon white vinegar (optional, but helps create tenderness)
For the Filling:
- 6 cups fresh or frozen blueberries (about 2 pounds)
- ¾ cup granulated sugar (adjust according to berry sweetness)
- ¼ cup cornstarch
- 2 tablespoons fresh lemon juice
- 1 teaspoon lemon zest
- ½ teaspoon ground cinnamon
- ¼ teaspoon salt
- 1 tablespoon unsalted butter, cut into small pieces
For the Finish:
- 1 large egg beaten with 1 tablespoon water (for egg wash)
- 1 tablespoon coarse sugar for sprinkling (optional)
Step-by-Step Blueberry Pie Instructions
Making the Perfect Pie Crust
The foundation of any great pie is its crust. Follow these steps for pastry perfection:
- Combine dry ingredients: In a large bowl, whisk together flour, sugar, and salt.
- Cut in the butter: Using a pastry cutter, two knives, or your fingertips, work the cold butter into the flour mixture until it resembles coarse meal with some pea-sized pieces remaining. The secret to flakiness is leaving some larger butter chunks intact – they create steam pockets during baking that result in those desirable flaky layers.
- Add cold liquid: Drizzle in 6 tablespoons of ice water and the vinegar (if using). Stir with a fork until the dough begins to come together. If needed, add more water 1 tablespoon at a time. The dough should hold together when squeezed but shouldn’t be sticky.
- Divide and chill: Divide the dough into two portions, one slightly larger than the other (for the bottom crust). Shape each into a disk, wrap in plastic wrap, and refrigerate for at least 1 hour or up to 2 days. Chilling is non-negotiable – it relaxes the gluten (preventing toughness) and firms the butter (ensuring flakiness).
- Roll out the bottom crust: On a lightly floured surface, roll the larger disk into a 12-inch circle. Transfer to a 9-inch pie plate, gently pressing into the bottom and sides. Trim edges to leave a 1-inch overhang, then refrigerate while preparing the filling.
Preparing the Blueberry Filling
The perfect filling balances sweet and tart flavors while achieving that ideal consistency – not too runny, not too firm:
- Prepare the berries: If using fresh blueberries, rinse and thoroughly dry them. If using frozen, do not thaw – use them straight from the freezer.
- Mix filling ingredients: In a large bowl, gently toss the blueberries with sugar, cornstarch, lemon juice, zest, cinnamon, and salt until evenly coated. The cornstarch is your thickening agent, while the lemon juice brightens the flavor and helps activate the thickening properties of the cornstarch.
- Let it sit: Allow the mixture to sit for 15 minutes if using fresh berries. This draws out some juices and begins dissolving the sugar and cornstarch, leading to a more cohesive filling.
Assembling & Baking the Pie
Now comes the fun part – bringing it all together and transforming your ingredients into a beautiful pie:
- Fill the pie: Pour the blueberry mixture into the chilled bottom crust. Dot the surface with the small pieces of butter (this adds richness and helps create a glossy filling).
- Create the top crust: Roll out the remaining dough disk into a 11-inch circle. You have options here:
- For a full top crust: Place it over the filling, trim the edges to match the bottom crust, then fold and crimp the edges together.
- For a lattice top: Cut the dough into strips and weave them over the filling for a classic look.
- Apply egg wash: Brush the top crust with egg wash for a beautiful golden shine. Sprinkle with coarse sugar if desired for extra sparkle and crunch.
- Chill again: Place the assembled pie in the refrigerator for 15-20 minutes. This final chill firms up the butter in the crust again, preventing shrinkage during baking.
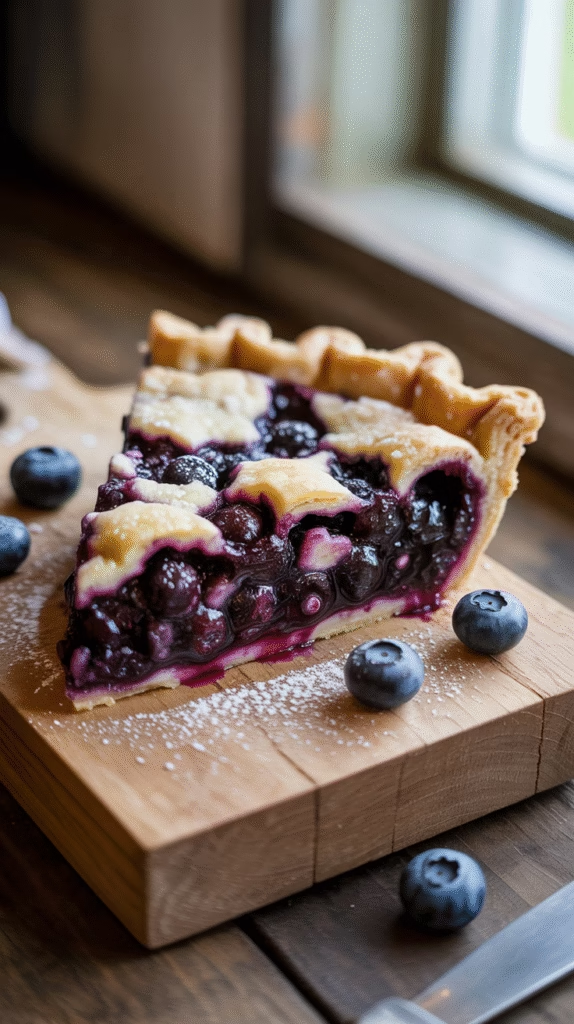
- Bake: Place the pie on a baking sheet (to catch any potential drips) and bake in a preheated 425°F oven for 20 minutes. Then reduce the temperature to 375°F and continue baking for 35-45 minutes more, until the crust is golden brown and the filling is bubbling vigorously. If the edges begin to brown too quickly, cover them with foil.
- Cool completely: Allow the pie to cool on a wire rack for at least 3 hours before slicing. This crucial step allows the filling to set properly.
Expert Tips for the Best Blueberry Pie
Take your pie from good to extraordinary with these professional tricks:
Preventing a Runny Filling
This is the #1 blueberry pie problem, but it’s easily solved:
- Ensure you’re using enough thickener (cornstarch) for the amount of berries
- Let the filling bubble vigorously in the oven – this activates the thickening properties
- Cool the pie completely before cutting – at least 3 hours at room temperature
- For extra insurance, mix 1 tablespoon of tapioca flour with your cornstarch
Perfect Storage & Reheating
- Store your completely cooled pie at room temperature, loosely covered, for up to 2 days
- For longer storage, refrigerate for up to 5 days
- To reheat, warm individual slices in a 350°F oven for 10-15 minutes
- Prefer a microwave? Heat for 20-30 seconds per slice, but the crust won’t stay as crisp
Serving Suggestions
Elevate your blueberry pie experience with these perfect pairings:
- A scoop of vanilla ice cream that slowly melts into the warm filling
- Freshly whipped cream with a hint of vanilla
- A dollop of crème fraîche for a sophisticated tangy contrast
- A drizzle of warm custard sauce for the ultimate comfort dessert
Blueberry Pie Variations & Substitutions
Customize your pie to suit dietary needs or just to experiment with flavors:
Gluten-Free Blueberry Pie
Replace all-purpose flour with a high-quality gluten-free flour blend that contains xanthan gum. Add ¼ teaspoon of xanthan gum if your blend doesn’t include it. The rest of the recipe remains the same!
Vegan Blueberry Pie
Substitute the butter in the crust with solid coconut oil or plant-based butter. Skip the egg wash and instead use plant milk mixed with 1 teaspoon of maple syrup for glazing.
Flavor Twists
- Add ¼ cup of fresh basil for an unexpected herbal note
- Mix in 1-2 cups of other berries like blackberries or raspberries
- Introduce ¼ teaspoon of cardamom or nutmeg for warm spice notes
- Stir in 1 teaspoon of pure almond extract for a complementary flavor

Common Blueberry Pie Mistakes (And How to Fix Them)
Even experienced bakers run into issues sometimes. Here’s how to troubleshoot:
Watery Filling
Problem: You cut into your pie and filling runs everywhere. Solution: Next time, increase cornstarch by 1-2 tablespoons and make sure to let the pie bubble vigorously in the oven and cool completely.
Tough Crust
Problem: Your crust is more like cardboard than a flaky delight. Solution: You’re likely overworking the dough or using too much water. Handle the dough minimally and add water gradually just until the dough comes together.
Pale, Unappetizing Crust
Problem: Your crust lacks that golden-brown appeal. Solution: Don’t skip the egg wash, and consider baking on a lower rack in your oven. If needed, increase your oven temperature by 25°F for the last 10 minutes of baking.
Filling Bubbles Over
Problem: Your oven is now covered in sticky blueberry juice. Solution: Always place your pie on a rimmed baking sheet, and consider reducing your filling slightly or creating a higher edge on your crust.
Conclusion
The art and science of creating the perfect blueberry pie is both an art and a science, but this foolproof recipe gives you everything you need to bake a pie worthy of centerpiece status at any gathering. This combination of juicy, sweet-tart blueberries and buttery flaky crust results in a dessert that can be enjoyed throughout the seasons and for all occasions, whether you are picking fresh berries in the summer or using frozen berries during the winter months. There is nothing more satisfying than baking a pie with purple-blue filling bubbling through a golden lattice crust. So heat up your oven, sprinkle some flour on your counter, and get ready to make a blueberry pie that will have everyone begging for seconds – and your recipe.
Homemade Blueberry Pie Recipe (2025)
Course: DessertCuisine: AmericanDifficulty: Medium8
servings45
minutes55
minutes420
kcal1
hour40
minutesThis classic homemade blueberry pie features a flaky, buttery crust filled with juicy, sweet-tart blueberries perfectly spiced with cinnamon and brightened with fresh lemon. Made with simple ingredients and traditional techniques, this pie delivers that perfect balance of tender fruit and crisp pastry that makes it an all-time favorite dessert. Whether you’re celebrating summer’s blueberry season or just craving a slice of comfort, this recipe creates a bakery-quality pie that’s sure to impress family and friends.
Ingredients
For the Pie Crust:
2½ cups all-purpose flour
1 teaspoon salt
1 tablespoon granulated sugar
1 cup (2 sticks) cold unsalted butter, cubed
6-8 tablespoons ice water
- For the Blueberry Filling:
6 cups fresh blueberries (or 5 cups if using frozen, thawed and drained)
¾ cup granulated sugar
⅓ cup cornstarch
2 tablespoons lemon juice
1 teaspoon lemon zest
½ teaspoon vanilla extract
¼ teaspoon salt
¼ teaspoon ground cinnamon
2 tablespoons cold butter, cut into small pieces
- For Assembly:
1 large egg, beaten (for egg wash)
1 tablespoon coarse sugar (for sprinkling)
Directions
Prepare the Pie Crust:
- In a large bowl, whisk together flour, salt, and sugar.
- Add cold butter cubes and cut into flour mixture using pastry cutter until mixture resembles coarse crumbs with some pea-sized pieces.
- Gradually add ice water, 1 tablespoon at a time, mixing gently until dough just comes together.
- Divide dough in half, shape into disks, wrap in plastic wrap, and refrigerate for at least 1 hour.
- Prepare the Filling:
- In a large bowl, gently combine blueberries, sugar, cornstarch, lemon juice, lemon zest, vanilla, salt, and cinnamon.
- Let mixture sit for 15 minutes to allow juices to develop.
- Assemble the Pie:
- Preheat oven to 425°F (220°C).
- Roll out bottom crust and place in 9-inch pie pan. Trim edges, leaving 1-inch overhang.
- Pour blueberry filling into crust and dot with small pieces of cold butter.
- Roll out top crust and place over filling. Trim, seal, and crimp edges.
- Cut 4-5 steam vents in top crust.
- Brush top crust with beaten egg and sprinkle with coarse sugar.
- Bake the Pie:
- Place pie on bottom rack of oven and bake for 20 minutes.
- Reduce temperature to 375°F (190°C) and continue baking for 35-40 minutes until crust is golden brown and filling is bubbling.
- If edges brown too quickly, cover with aluminum foil.
- Cool on wire rack for at least 3 hours before serving to allow filling to set.
Notes
- Fresh vs. Frozen: Fresh blueberries work best, but frozen can be used. Don’t thaw frozen berries completely to prevent excess moisture.
Preventing Soggy Bottom: Bake on the bottom rack for the first 20 minutes to ensure bottom crust cooks properly.
Lattice Option: For a decorative top, create a lattice crust instead of solid top crust.
Make-Ahead: Pie crust can be made 2 days ahead and refrigerated, or frozen for up to 3 months.
