There’s nothing quite like the smell of freshly baked cinnamon rolls wafting through your home! That first bite of a warm roll – pillowy dough wrapped around a sweet cinnamon-sugar filling and topped with melty cream cheese frosting – is pure comfort food magic. After 15 years of weekend baking, I’ve perfected this foolproof recipe that works whether you’re a first-timer or looking to elevate your cinnamon roll game. Let’s get rolling!
The History of Cinnamon Rolls: From Sweden to Your Kitchen
Did you know that cinnamon rolls originated in Sweden? That’s right! The traditional Swedish kanelbullar (cinnamon buns) were born in the 1920s when ingredients like cinnamon, sugar, and butter became more readily available to the average household. Unlike the American-style cinnamon rolls we know today, traditional Swedish versions are less sweet, often flavored with cardamom, and typically topped with pearl sugar rather than frosting. Famous bakeries like Cinnabon, which opened its first store in 1985, have played a huge role in popularizing these sweet treats. Their mall-based stores strategically placed near entrances would fill the air with that unmistakable cinnamon aroma, making them nearly impossible to resist. While Cinnabon may have made cinnamon rolls famous commercially, the tradition of home-baked cinnamon rolls remains strong, particularly during holidays and special weekend breakfasts.
Essential Ingredients for Perfect Cinnamon Rolls
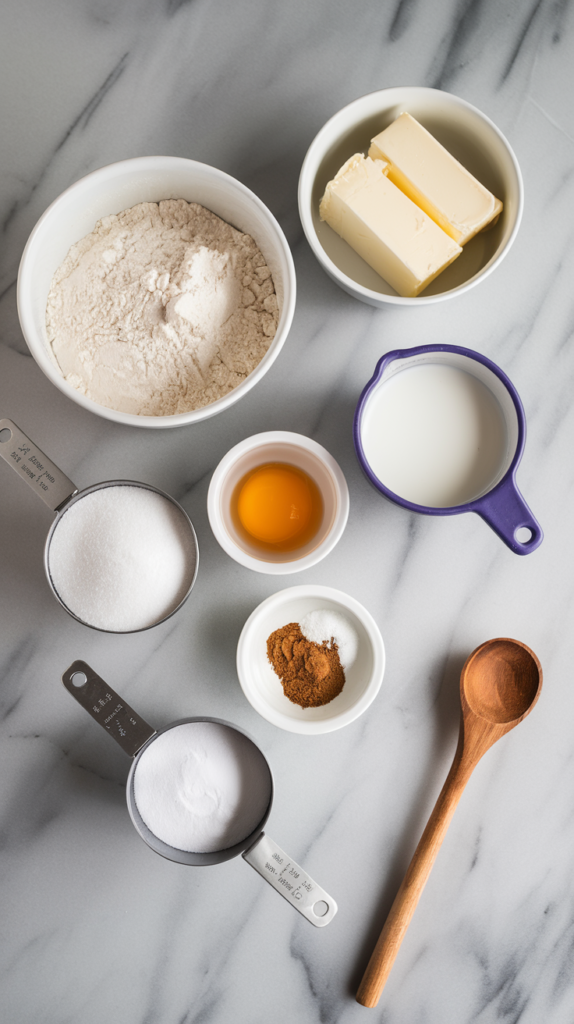
The beauty of cinnamon rolls lies in their simplicity – they’re made with pantry staples that combine to create something truly magical. Let’s break down the key players:
The Dough:
- Flour: While all-purpose flour works perfectly well, bread flour with its higher protein content (12-14% versus 10-12% in all-purpose) creates a chewier, more structured roll. For the absolute best texture, I recommend using 75% bread flour and 25% all-purpose flour, which gives you structure without toughness.
- Yeast: Active dry yeast needs to be activated in warm liquid before using, while instant yeast can be mixed directly with dry ingredients. Either works beautifully, but instant yeast will save you about 10-15 minutes of proofing time. One packet (2¼ teaspoons) is perfect for a standard batch.
- Milk: Whole milk adds richness and helps create that tender crumb we’re after. The fat content matters – skim milk will yield less indulgent rolls.
- Butter: Unsalted butter gives you control over the salt content. European-style butter with higher fat content (82% versus the standard 80%) creates an even richer dough if you want to splurge.
- Eggs: These provide structure, richness, and help with that beautiful golden color. Room temperature eggs incorporate more easily.
- Sugar: Granulated sugar feeds the yeast and adds sweetness. Don’t reduce this amount as it affects not just flavor but texture.
- Salt: Don’t skip this! Salt controls yeast activity and enhances all the flavors. I prefer fine sea salt for even distribution.
The Filling:
- Cinnamon: The star ingredient! Splurging on high-quality cinnamon makes a noticeable difference. Ceylon cinnamon (also called “true cinnamon”) has a more complex, subtle flavor compared to the more common Cassia cinnamon, which has that stronger, spicier kick we typically associate with cinnamon rolls.
- Brown Sugar: Light brown sugar is traditional, but dark brown sugar adds more molasses notes. Either works wonderfully.
- Butter: Softened to a spreadable consistency, this creates the gooey base for your filling.
- Optional additions: A pinch of nutmeg, cardamom, or orange zest can add complexity without overpowering the cinnamon.
The Frosting:
- Cream Cheese: Full-fat cream cheese creates that tangy, rich frosting that perfectly balances the sweet rolls.
- Butter: Again, unsalted gives you control.
- Powdered Sugar: Provides sweetness and the smooth texture without grittiness.
- Vanilla Extract: Pure vanilla extract adds depth of flavor.
Foolproof Cinnamon Roll Dough: Step-by-Step Instructions
Creating the perfect dough is the foundation of exceptional cinnamon rolls. Here’s my foolproof method:
Ingredients for the Dough:
- 4 cups (500g) bread flour (or 3 cups bread flour + 1 cup all-purpose)
- 1 packet (2¼ teaspoons) instant yeast or active dry yeast
- ⅓ cup (67g) granulated sugar
- 1 teaspoon fine sea salt
- 1 cup (240ml) whole milk
- ⅓ cup (75g) unsalted butter
- 2 large eggs, room temperature
- 1 teaspoon vanilla extract (optional but recommended)
The Process:
- Prepare the yeast: If using active dry yeast, warm the milk to 110°F (43°C) – it should feel warm but not hot to the touch. Add a teaspoon of your measured sugar and the yeast, stir gently, and let sit for 5-10 minutes until foamy. If using instant yeast, simply warm the milk and proceed to the next step (you’ll add the yeast directly to the dry ingredients).
- Prepare the wet ingredients: Melt the butter (either in the microwave or stovetop) and let it cool slightly. In a separate bowl, whisk together the eggs and vanilla extract.
- Mix the dry ingredients: In a large bowl or the bowl of your stand mixer, whisk together the flour, sugar (minus the teaspoon used for proofing if applicable), salt, and instant yeast (if using that type).
- Combine wet and dry ingredients: Create a well in the center of your dry ingredients. Pour in the warm milk mixture, melted butter, and egg mixture. If using a stand mixer, mix on low speed with the dough hook until the ingredients come together. If mixing by hand, use a wooden spoon to combine everything into a shaggy dough.
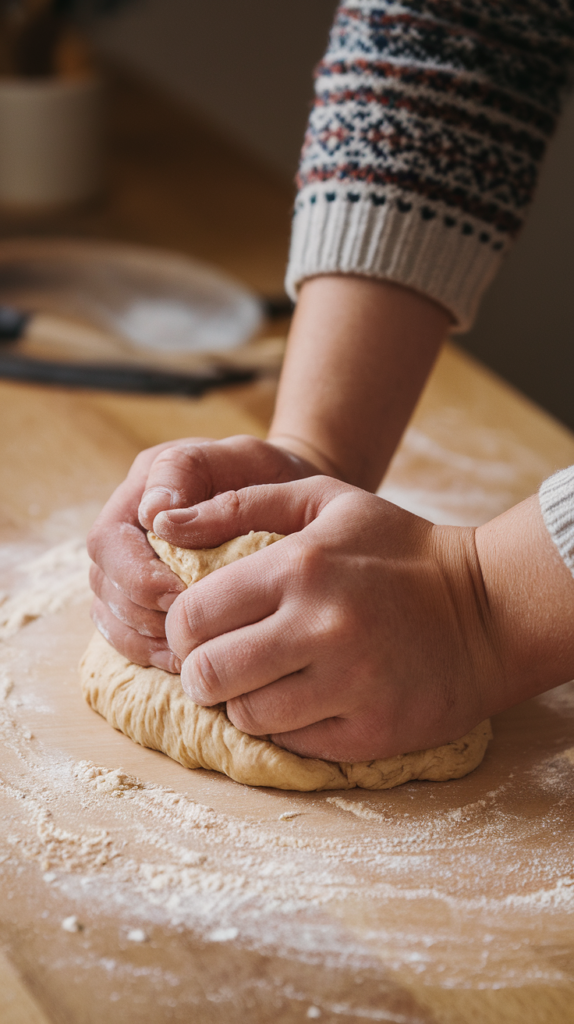
- Knead the dough:
- With a stand mixer: Increase to medium speed and knead for 8-10 minutes. The dough should pull away from the sides of the bowl but still stick slightly to the bottom. It should feel smooth and elastic.
- By hand: Turn the dough onto a floured surface and knead for 10-12 minutes. The dough is ready when it’s smooth, elastic, and passes the “windowpane test” – when you can stretch a small piece thin enough to see light through without tearing.
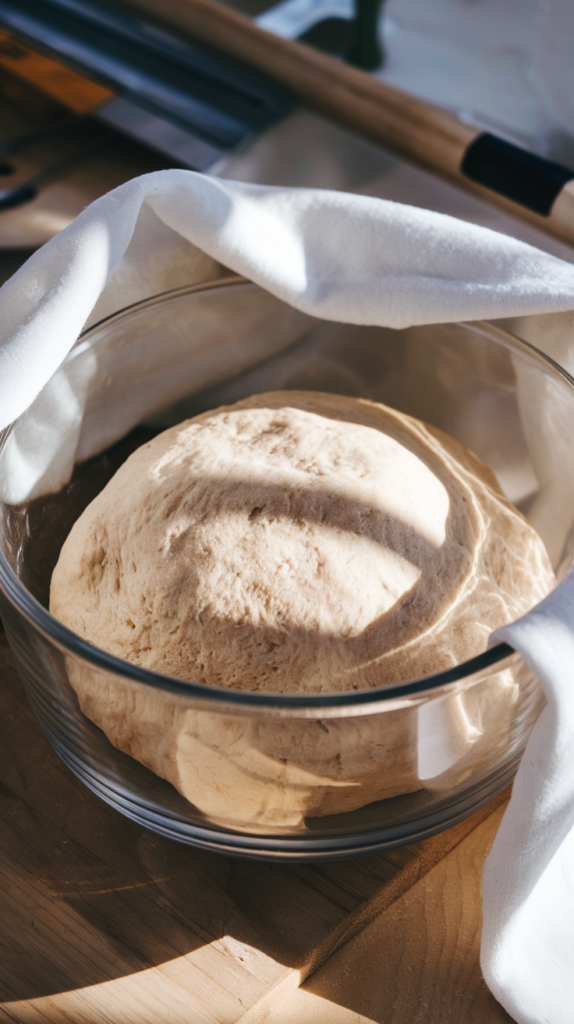
- First rise: Shape the dough into a ball and place it in a lightly greased bowl. Cover with plastic wrap or a clean kitchen towel. Let it rise in a warm place (around 75°F/24°C) until doubled in size, about 1-1.5 hours. The ideal spot is an oven with just the light turned on, which creates a perfect warm environment.
- The dough should be soft and slightly tacky but not sticky enough to coat your fingers.
- After kneading, it should feel like a soft earlobe when you pinch it.
- When properly risen, it will have doubled in volume and when you press it gently with your finger, the indentation should remain (rather than springing back immediately).
Troubleshooting Common Dough Problems:
- Too sticky: Add flour 1 tablespoon at a time during kneading.
- Too dry: Add milk 1 tablespoon at a time until the right consistency is achieved.
- Not rising: Your yeast might be old, or the environment too cold. Try moving to a warmer spot or waiting longer.
Mastering the Perfect Cinnamon-Sugar Filling
The filling is where the magic happens! Here’s how to create that perfect gooey, cinnamon-laden center:
Ingredients for the Filling:
- ¾ cup (150g) light brown sugar, packed
- 2 tablespoons ground cinnamon (preferably Ceylon for a complex flavor)
- ¼ teaspoon freshly grated nutmeg (optional)
- Pinch of salt
- ½ cup (113g) unsalted butter, softened to room temperature
The Process:
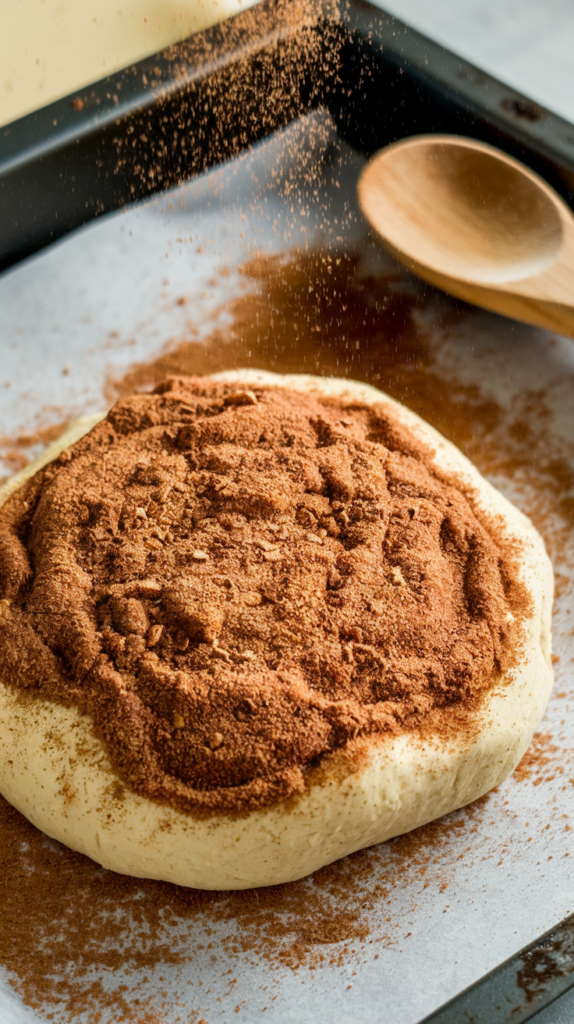
- Mix the dry ingredients: In a small bowl, whisk together the brown sugar, cinnamon, nutmeg (if using), and salt until well combined.
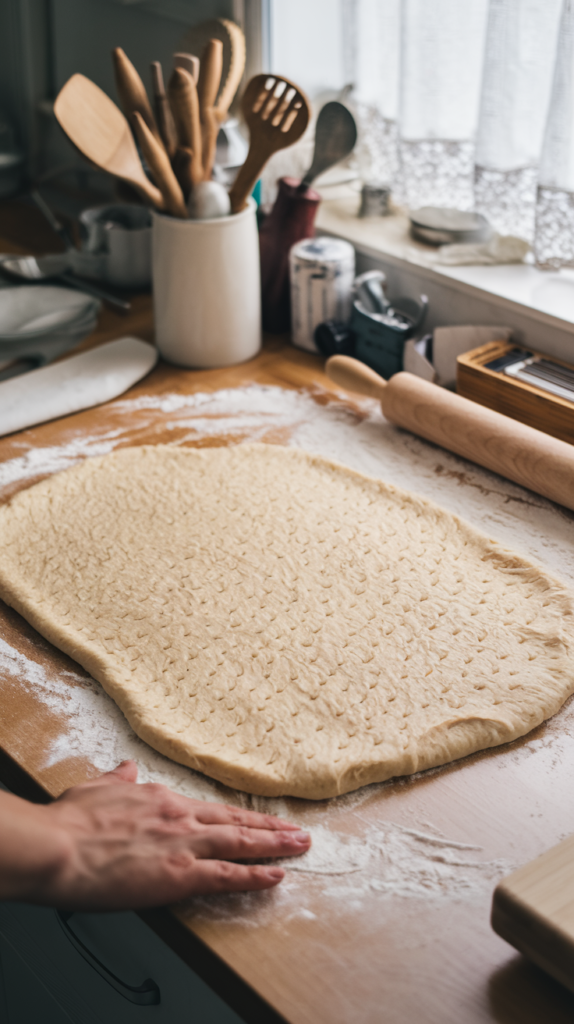
- Prepare the dough: After the first rise, punch down the dough gently to release air bubbles. On a lightly floured surface, roll the dough into a rectangle approximately 18×12 inches (45×30 cm). The dough should be about ¼ inch (6mm) thick.
- Spread the butter: Using a spatula or the back of a spoon, spread the softened butter evenly over the surface of the dough, leaving a ½-inch (1 cm) border along one long edge (this will help seal the roll).
- Add the filling: Sprinkle the cinnamon-sugar mixture evenly over the buttered surface, gently pressing it into the butter with your hands or a spatula.
Rolling, Cutting, and Shaping Techniques for Beautiful Swirls
This is where you transform your flat dough into those iconic spiraled beauties:
Rolling the Perfect Log:

- Position the dough: With the filled rectangle positioned so that one long edge is parallel to the edge of your counter closest to you, prepare to roll.
- The rolling technique: Starting from the long edge closest to you (the one without the clean border), begin rolling the dough away from you into a tight log. Use both hands and work from the center outward for even tightness. The tighter the roll, the more defined your spirals will be, but don’t squeeze so tight that filling squishes out.
- Seal the edge: When you reach the clean border you left, gently press it against the log to seal it. Position the log so the seam is facing down.
Cutting Perfect Rolls:
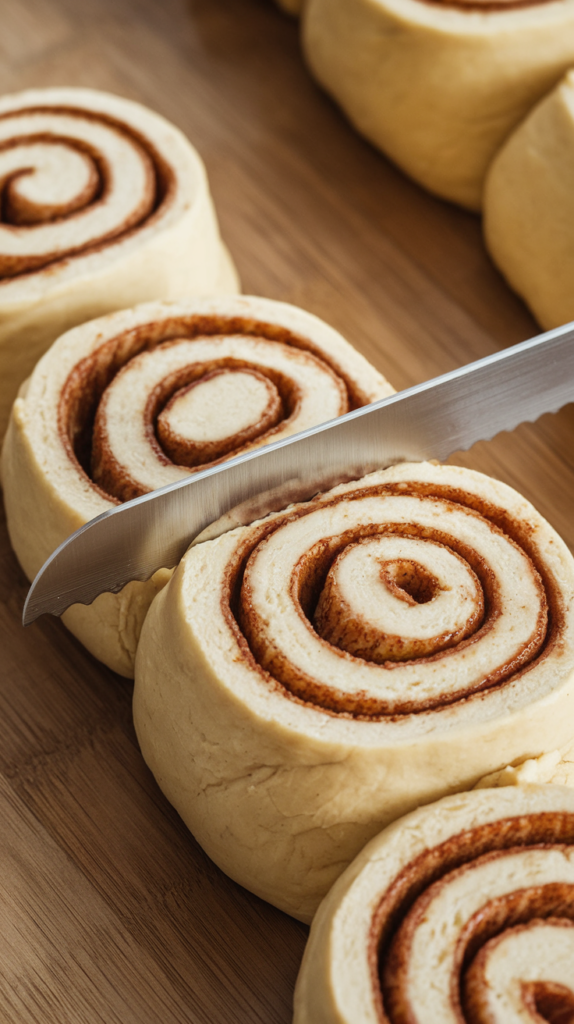
- Mark your cuts: For even-sized rolls, use the edge of a bench scraper to lightly mark where you’ll cut. For a standard batch, mark 12 equal sections (approximately 1.5 inches/4 cm each).
- The dental floss method (preferred):
- Slide a piece of unflavored dental floss under the log
- Cross the ends of the floss over the top of the log
- Pull the ends in opposite directions to cut through the dough cleanly
- Alternative cutting methods:
- Very sharp serrated knife: Use a gentle sawing motion to avoid compressing the roll
- Bench scraper: Press straight down firmly for a clean cut
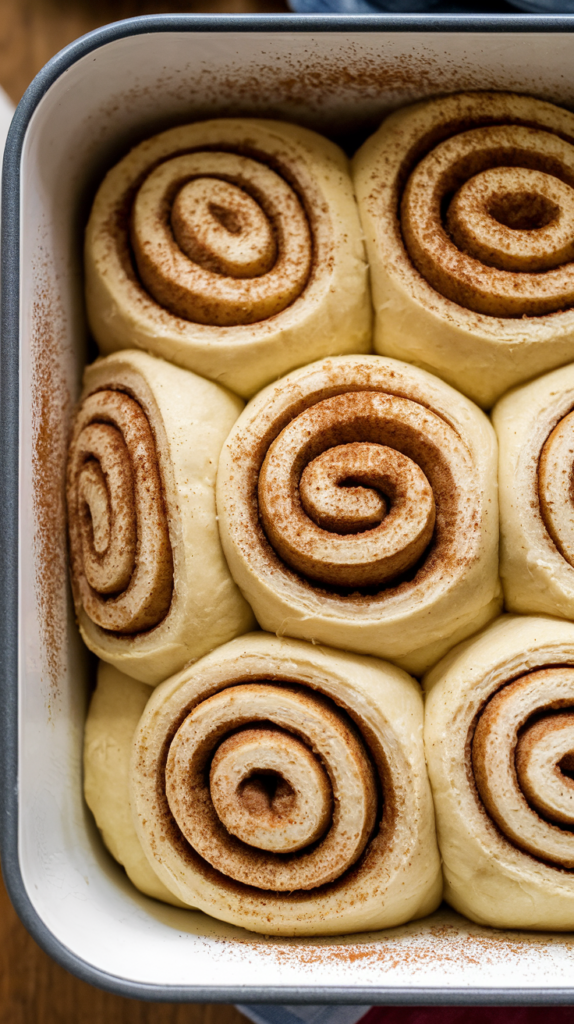
The Second Rise: Patience for Unbelievable Fluffiness
The second rise is crucial for achieving those ethereally light, fluffy cinnamon rolls:
The Process:
- Cover the rolls: Loosely cover the pan with plastic wrap or a clean kitchen towel.
- Find the right environment: Place in a warm spot (75-80°F/24-27°C) free from drafts. Again, an oven with just the light on is perfect.
- The waiting game: Let the rolls rise until noticeably puffy and nearly doubled in size, about 45-60 minutes. They should be touching or almost touching each other.
Visual Cues for Perfectly Proofed Rolls:
- The rolls should look puffy and have expanded to fill most of the spaces between them
- When gently pressed with a knuckle, the dough should indent and slowly bounce back (not spring back immediately)
- You should see air bubbles just beneath the surface of the dough
The Overnight Method:
For fresh morning rolls without the early wake-up:
- After placing cut rolls in the pan, cover tightly with plastic wrap and refrigerate for up to 16 hours.
- The next morning, remove from refrigerator and let stand at room temperature for 1-2 hours before baking.
- Proceed with baking as directed below.
Baking Tips for Perfectly Golden, Evenly Cooked Rolls
Now it’s time to transform your beautiful raw dough into perfectly baked cinnamon rolls:
Baking Instructions:
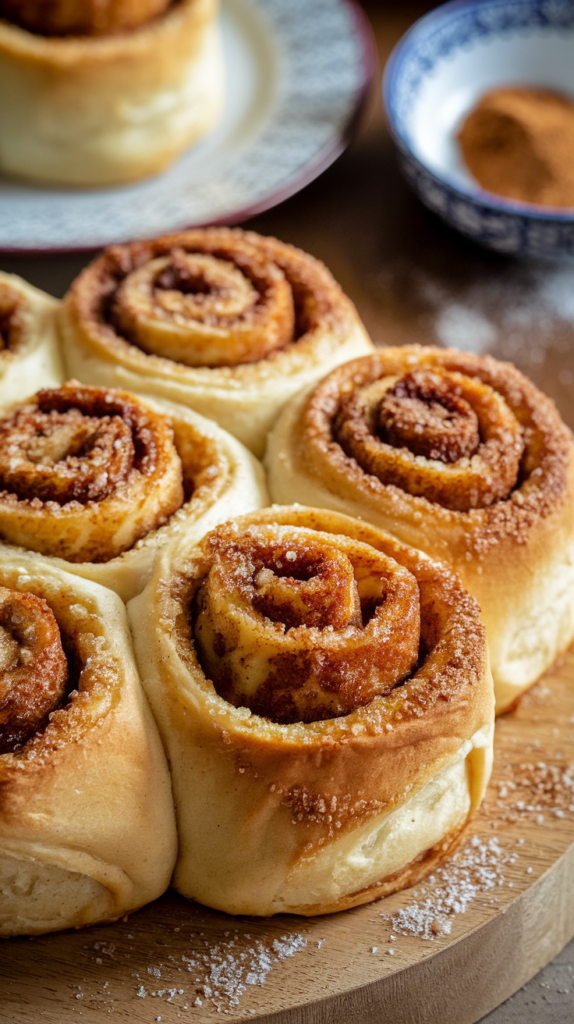
- Preheat the oven: About 20 minutes before baking, preheat to 350°F (175°C). Position rack in the center of the oven.
- Optional pre-bake step: For extra richness, brush tops of proofed rolls lightly with 2 tablespoons melted butter or 1 beaten egg for a glossy finish.
- Baking time: Bake for 22-25 minutes until the rolls are golden brown on top and a thermometer inserted into the center roll reads 190°F (88°C).
- Visual cues for doneness:
- Tops should be golden brown but not dark
- Exposed filling may be bubbling slightly
- When gently pulled apart in the center, no wet dough should be visible
- The rest period: This is crucial! Allow rolls to cool in the pan for at least 10 minutes before frosting. This allows the structure to set and prevents the frosting from melting completely.
Frosting Options: From Classic Cream Cheese to Adventurous Alternatives
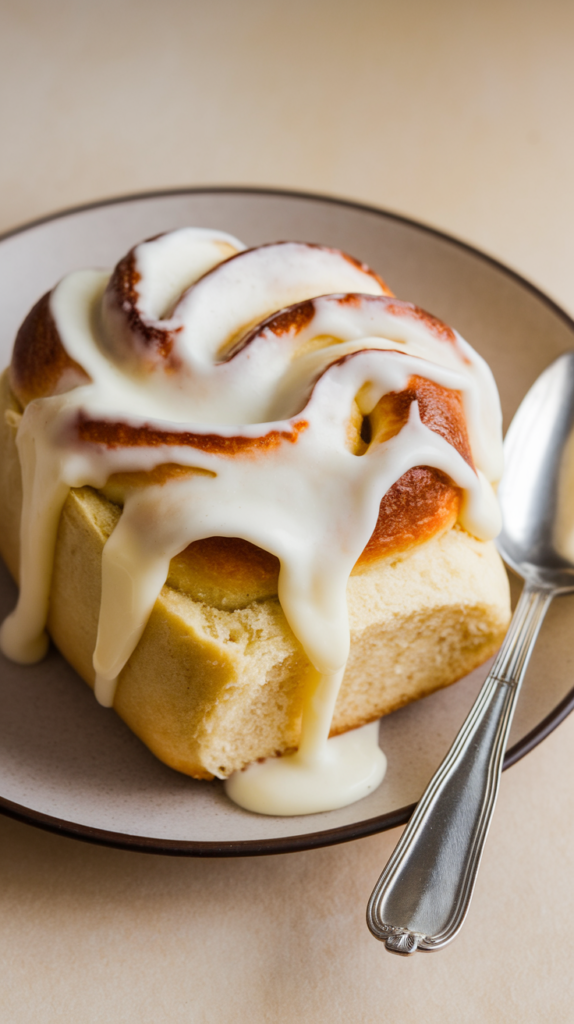
The crowning glory of any great cinnamon roll is its frosting. Here are options ranging from classic to creative:
Classic Cream Cheese Frosting:
Ingredients:
- 4 oz (113g) full-fat cream cheese, softened
- ¼ cup (57g) unsalted butter, softened
- 1½ cups (180g) powdered sugar, sifted
- 1 teaspoon vanilla extract
- Pinch of salt
Instructions:
- In a medium bowl, beat cream cheese and butter until smooth and fully combined, about 2 minutes.
- Add powdered sugar gradually, mixing on low speed until incorporated.
- Add vanilla and salt, then increase speed to medium-high and beat until light and fluffy, about 1 minute.
- Spread over slightly cooled rolls (they should be warm but not hot).
Simple Vanilla Glaze (Lighter Option):
Ingredients:
- 2 cups (240g) powdered sugar
- 3-4 tablespoons milk or cream
- 1 teaspoon vanilla extract
- Pinch of salt
Instructions:
- Whisk all ingredients together until smooth, starting with 3 tablespoons of milk.
- Add additional milk as needed to reach desired consistency.
- Pour over rolls while still warm for a thin, soaking glaze.
Brown Butter Frosting (For Caramel Notes):
Ingredients:
- ½ cup (113g) unsalted butter
- 2 cups (240g) powdered sugar
- 1 teaspoon vanilla extract
- 3-4 tablespoons milk or cream
- Pinch of salt
Instructions:
- In a small saucepan, melt butter over medium heat. Continue cooking, swirling occasionally, until butter turns amber and smells nutty, about 5-7 minutes.
- Transfer to a heat-proof bowl and let cool until no longer hot but still liquid.
- Whisk in powdered sugar, vanilla, and salt.
- Gradually add milk until desired consistency is reached.
- Spread over warm (not hot) rolls.
Creative Variations:
- Maple Frosting: Replace vanilla extract with 1 tablespoon pure maple syrup in the classic cream cheese frosting.
- Orange Cream Cheese Frosting: Add 1 tablespoon orange zest and 1 tablespoon orange juice to classic cream cheese frosting.
- Coffee Glaze: Replace 2 tablespoons of milk with strong brewed coffee in the simple glaze recipe.
- Coconut Frosting: Add ½ teaspoon coconut extract to classic frosting and top with toasted coconut flakes.
Make-Ahead and Storage Solutions for Fresh-Tasting Cinnamon Rolls
One of the best things about cinnamon rolls is their flexibility – you can prepare them in advance and enjoy them fresh when you want them:
Make-Ahead Options:
- Refrigerate after shaping (before second rise):
- Place shaped rolls in baking pan, cover tightly with plastic wrap
- Refrigerate for up to 16 hours
- Remove from refrigerator 1-2 hours before baking to come to room temperature and complete second rise
- Bake as directed
- Freeze unbaked rolls (after shaping, before second rise):
- Place rolls in a disposable aluminum pan
- Cover tightly with plastic wrap, then aluminum foil
- Freeze for up to 4 weeks
- Thaw overnight in refrigerator, then bring to room temperature for 1-2 hours
- Bake as directed
- Prepare dough in advance:
- After the first rise, punch down dough
- Shape into a ball and place in a lightly greased bowl
- Cover tightly and refrigerate for up to 24 hours
- Remove from refrigerator, let sit 20 minutes, then proceed with rolling and filling
Storage Solutions:
- Room temperature storage:
- Frosted rolls: Cover loosely with foil or plastic wrap and consume within 2 days
- Unfrosted rolls: Store in airtight container for up to 3 days
- Refrigerator storage:
- Frosted or unfrosted: Store in airtight container for up to 5 days
- Bring to room temperature before serving or reheat briefly
- Freezer storage (baked rolls):
- Unfrosted: Wrap individual rolls in plastic wrap, then foil
- Frosted: Freeze unwrapped until frosting is solid, then wrap
- Store in freezer-safe container for up to 2 months
- Thaw overnight in refrigerator or at room temperature for several hours
Reheating Methods:
- Microwave method (quickest, best for individual rolls):
- Place roll on microwave-safe plate
- Heat for 15-20 seconds until just warm
- Be careful not to overheat or they’ll become tough
- Oven method (best for multiple rolls):
- Preheat oven to 300°F (150°C)
- Place rolls on baking sheet
- For unfrosted rolls: Sprinkle with a few drops of water and cover loosely with foil
- Heat for 10-15 minutes until warm throughout
- Air fryer method (for crispy edges):
- Preheat air fryer to 280°F (138°C)
- Place 1-2 rolls in basket, heat for 2-3 minutes
- Perfect for reviving day-old rolls
Presentation Ideas:
- Gift Giving: Place individual rolls in paper baking cups, then in small decorative boxes with ribbons
- Brunch Centerpiece: Arrange in a spiral pattern on a large decorative platter with fresh berries in the center
- Cinnamon Roll “Cake”: Bake rolls close together in a round cake pan, frost the entire top surface, and add birthday candles for a unique celebration
- Dessert Transformation: Serve warm with a scoop of vanilla ice cream and caramel sauce for an elevated dessert
Cinnamon Roll Bar Ideas:
Set up a DIY cinnamon roll bar for brunches and gatherings:
- Warm unfrosted or lightly glazed rolls
- Selection of frostings (cream cheese, maple, vanilla, chocolate)
- Toppings bar including:
- Chopped toasted nuts (pecans, walnuts, pistachios)
- Fresh berries and sliced fruit
- Shredded coconut
- Chocolate chips or shaved chocolate
- Caramel sauce and chocolate sauce
- Sprinkles and crushed cookies
- Flavored whipped creams
Conclusion
There you have it – everything you need to create absolutely incredible cinnamon rolls right in your own kitchen! I hope this guide has given you the confidence to tackle this beloved treat, whether you’re making them for a special holiday breakfast or just because it’s Tuesday and you deserve something delicious.
Remember, perfect cinnamon rolls come with practice, so don’t worry if your first batch isn’t Instagram-worthy. The beauty of homemade baking is in the process itself, and I promise the warm, cinnamon-filled kitchen and the smiles of anyone lucky enough to grab a roll will be worth every minute.Essential Ingredients for Perfect Cinnamon Rolls