Ever dreamed of sinking your teeth into a warm, golden bite of chewy pretzel that you made yourself? Well, stop waiting for the mall snack stand and whip up a batch of these homemade pretzel bites instead! Even beginners nail this (no professional pretzel-twisting skills needed).
They’re surprisingly easy to make, using pantry staples and a fun baking-soda bath trick to give them that signature flavor. If you’ve got five minutes, some yeast, and a blender – er, I mean, oven – you’re pretty much set. Seriously, anyone can do this (yes, even you). So, let’s roll up those sleeves (literally) and get baking.
Believe me, your kitchen will smell like a dream :). You’ll fill your home with buttery, bready goodness that’ll have everyone asking for seconds. Ready to become a pretzel-baking hero? Let’s do this 🙂
Ingredients
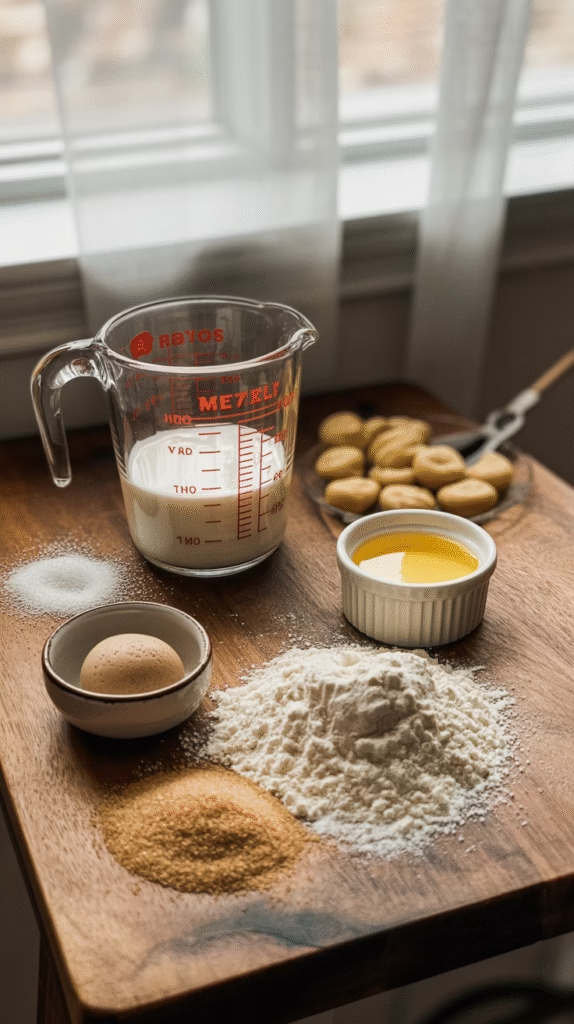
Gather these pantry staples and you’re golden:
- 1½ cups warm water (about 110°F/43°C). Make sure it’s warm, not scorching hot, so the yeast can do its magic.
- 1 packet active dry yeast (2¼ teaspoons). It wakes up with the sugar and water combo.
- 1 tablespoon sugar (white or brown). Yeast loves a tiny snack, trust me 🙂 FYI it helps get things going.
- 1 teaspoon salt (kosher or table). We’ll mix this into the dough for flavor.
- 2–3 tablespoons melted butter (plus a little extra). Butter gives softness and that homemade taste.
- 3–4 cups all-purpose flour (start with 3½, then add more if needed). You’ll adjust the flour until the dough feels right.
- ½ cup baking soda (for the boiling bath). Weird, right? But this step makes pretzels, well, pretzel-y.
- Coarse salt or your favorite seasoning (for topping). Think pretzel salt, garlic powder, everything bagel seasoning, or cinnamon-sugar if you want sweet bites.
- Dipping sauces: spicy beer cheese, mustard, or (just saying) Nutella if you’re feeling adventurous.
Making the Dough
Mixing up the dough is a lot easier than it sounds. You’ll basically create a soft, slightly sticky bread dough. Here’s how:
- Combine 1½ cups warm water, sugar, and yeast in a large bowl. Stir gently and let it sit 5–10 minutes until foamy on top. (Pssst – lukewarm water is key; too hot and you’ll kill the yeast, which means dinner over, not fun.)
- Add salt, melted butter, and 3 cups of all-purpose flour to the bowl. Mix on low (or stir with a sturdy spoon) until a shaggy dough forms. If it’s sticky, sprinkle in up to ½ cup more flour. You want a soft ball that isn’t gummy.
- Knead the dough on a floured surface (or in your mixer) for about 5 minutes. You’re looking for a smooth, elastic feel – it should bounce back a bit if you poke it.
- Cover the dough loosely and let it rest for 10–15 minutes. It won’t double in size (we’re not making giant loaves here), but this short rest lets the gluten relax so you can roll it out easily.
Shaping the Pretzel Bites
Time to shape those bites! Working with this soft dough is almost therapeutic. These shapes are forgiving – you don’t need perfect pretzel knots (seriously, squiggly ropes are fine!).
- Turn the rested dough out onto a lightly floured surface. Pinch off a chunk (about 1 ounce or so), and roll it into a rope about 12 inches long.
- Slice each rope into 1–2 inch pieces. These are your pretzel bites. Arrange them on a parchment-lined baking sheet, leaving a little room between each so they have space to puff up.
Baking Soda Bath
Before baking, give each piece a quick dip in a boiling baking-soda bath:
- Bring 9 cups of water to a rolling boil in a wide pot or pan. Carefully stir in ½ cup baking soda (it might bubble up!).
- Working in batches, drop the pretzel bites into the boiling water. Let them cook for about 30 seconds (or up to 1 minute if you want extra browning).
- Use a slotted spoon to transfer the bites back to the baking sheet. This soda dip locks in that classic pretzel taste and texture.
- (If you read about a “lye bath,” don’t panic. Professional pretzels use lye for extra browning, but baking soda is a much safer home hack.)*
Baking
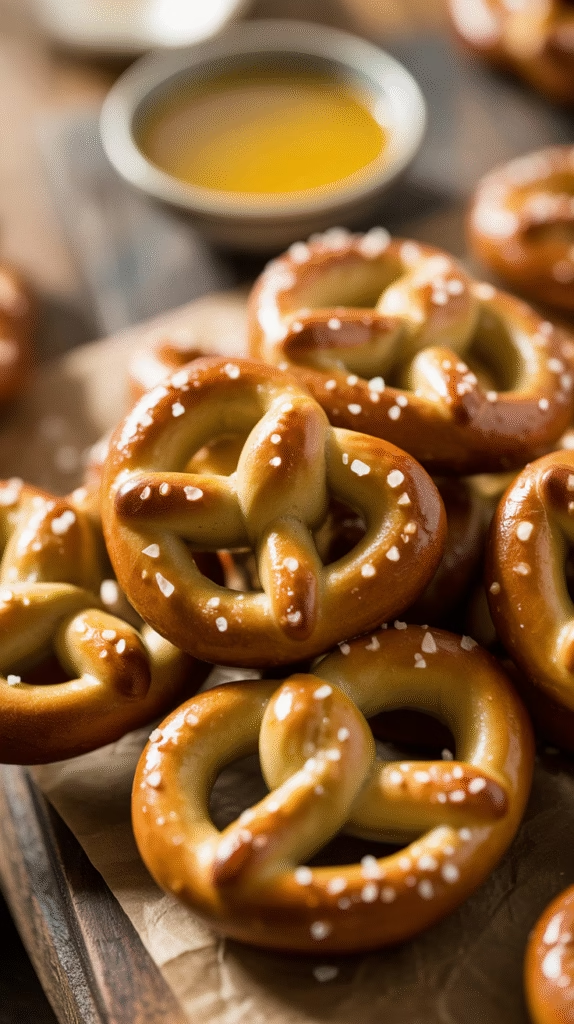
Almost there! Preheat your oven to 400°F (200°C) and line a baking sheet with parchment. Slide the sheet into the oven and bake the bites for about 12–15 minutes, or until they turn golden brown. You’ll know they’re done when they smell nutty and look a deep golden color.
When the pretzels come out, immediately brush them with melted butter and sprinkle coarse salt (or your chosen topping) over them while they’re still hot. Now step back – they smell and look amazing!
Toppings and Dips
These pretzel bites are basically a blank canvas for tasty toppings and dips! Here are some ideas:
Toppings
- Classic Coarse Salt: The traditional choice. Sprinkle a pinch of kosher or pretzel salt right after baking. It sticks to the warm butter beautifully.
- Everything Bagel Seasoning: Sprinkle this magical mix for a savory twist. It adds onion, garlic, and sesame flavors in one go!
- Garlic-Parmesan: Toss or brush the warm bites with garlic butter and sprinkle with grated Parmesan and herbs. Instant garlic bread vibes.
- Cinnamon Sugar: For dessert lovers (or rebellious snackers), mix cinnamon with sugar and toss the warm bites in it. Sweet, cozy, and slightly addictive.
Dips to Dunk In
- Beer Cheese or Queso: Gooey cheese sauce is a classic dip. It’s like a hug in a mug.
- Mustard (Yellow or Honey): Tangy or sweet mustard cuts through the richness nicely. Honey mustard is a personal fave!
- Marinara Sauce: A zingy marinara (pizza sauce) works surprisingly well too. Ketchup-lovers, this might remind you of pizza fries vibes.
- Chocolate or Caramel Sauce: Yep, I said it – for a sweet end. Because why should doughnuts have all the fun? 😜
Storing and Reheating
Got leftovers? (Good for you – I have none to save either.) Store your pretzel bites properly to keep them tasty:
- Short-term (1-2 days): Keep the bites in an airtight container or zip-top bag at room temperature. They stay soft for a day or two.
- Fridge (up to a week): You can refrigerate the bites, but they tend to dry out faster. If you do fridge them, pop them into the oven or microwave to refresh as below.
- Freezing (1-2 months): Once cooled completely, spread the bites on a baking sheet and freeze until solid (about 1 hour). Then transfer them to a freezer bag or container. They’ll keep in the freezer for 1-2 months.
Reheat any way you like! My favorite is the oven: preheat to 300°F (150°C) and warm the bites for 5–10 minutes until hot and crisp again. You can also nuke them for 15–30 seconds on high (though they might get a bit softer). Either way, brushing on a little extra butter after reheating brings back that fresh-baked taste.
Pro Tips
Here are some insider tips to nail these pretzel bites every time:
- Yeast temperature: If your water feels too hot or too cold, you can kill the yeast. Lukewarm (~110°F) is just right to wake it up. 😉
- Parchment paper: Go ahead and line those baking sheets. It makes cleanup a breeze and stops the dough from sticking (trust me, you’ll thank yourself).
- Don’t skip the soda: Seriously, that baking-soda bath is the secret sauce for chew and color. Treat it like sacred (and maybe watch it fizz dramatically).
- Knead it: A good 5 minutes of kneading makes your dough smooth. You can do it by hand with a little elbow grease (it’s kind of fun and a great arm workout!).
- Patience: These bites only need a brief rest. A 10–15 minute rise is enough before baking. Use the wait time to preheat the oven and multitask (like mixing up that dip!).
- Less is more: You don’t need a fancy stand mixer or weird equipment. A big bowl and some muscle are enough. My friend actually trained her dog to roll dough (yes, seriously) 😉, so if we can do this, so can you.
- Freeze-friendly: If you double the batch (I won’t judge), freeze extras for later. They reheat beautifully – just like magic, but tastier!
Troubleshooting
Even easy recipes have their quirks. Here are some quick fixes:
- Sticky dough: It’s normal for pretzel dough to feel tacky. Dust your hands and counter with a little flour and knead gently. If it’s super swampy, add flour 1 tablespoon at a time until it’s soft but not dry.
- No soda foam: If nothing bubbled when you mixed water and baking soda, check your water temp or amount of soda. Once it boils, it should fizz like a science experiment.
- Salt melting: If coarse salt is disappearing on you, sprinkle it right after baking (while the butter is still wet) so it sticks. You can also toss the warm bites in cinnamon-sugar immediately if you prefer sweet.
- Over-browned or uneven bake: Ovens can be hot spots. Try rotating the pan halfway through baking. If they brown too fast, turn the temp down a little next time.
- Yeast fail: No foam on the yeast mixture? Means your yeast took a nap (or died). No worries – get fresh yeast and start that step over.
Why Homemade Beats Store-Bought
I’m not saying store-bought pretzels are evil (well, kinda?). But let’s be real: nothing beats fresh-out-of-oven homemade pretzel bites. They’re warm, tender, and have this toasty, malty flavor thanks to that baking soda bath. Store-bought frozen pretzels can be convenient, but they often taste stale or a bit doughy, and you have zero control over the toppings or salt level.
With homemade bites, you get that perfect chew on the outside and fluffy pillow inside every single time. IMO, dunking these babies into cheese sauce or spicy mustard is an experience – try it and you’ll see 😉. Fresh pretzels also mean you control the ingredients: no weird preservatives or funky additives, just simple dough and love.
Plus, homemade is usually cheaper and better for you. Those fancy mall or grocery pretzels can cost a fortune per dozen, while you make a huge batch with a few bucks of flour and yeast (not to mention bragging rights!). In short: these homemade nuggets will impress taste buds and your wallet. Everybody wins!
So go ahead, trade the sad frozen bag for these hot little nuggets of joy. Your tastebuds (and everyone at your next party) will thank you. Now that’s a win! And hey, these are especially amazing with a cold beer or frothy soda – because snack time is serious business. 😉