
Some evenings, I want easy food that tastes good and doesn’t make a mess in my kitchen. I’ve found that cheesy taco sticks fit the bill. They’re simple, quick, and filling. There’s nothing fancy or complicated about them, but they hit the spot every time. Anybody can make these at home. All you really need is some pizza dough, ground meat, cheese, and a few minutes.
Why Cheesy Taco Sticks Work
This is one of those recipes that doesn’t need a backstory. If you’ve got kids, they’ll eat these. If you’re on your own, you’ll probably make them again. And if you have friends over, nobody complains. Sometimes food is just food, and that’s fine.
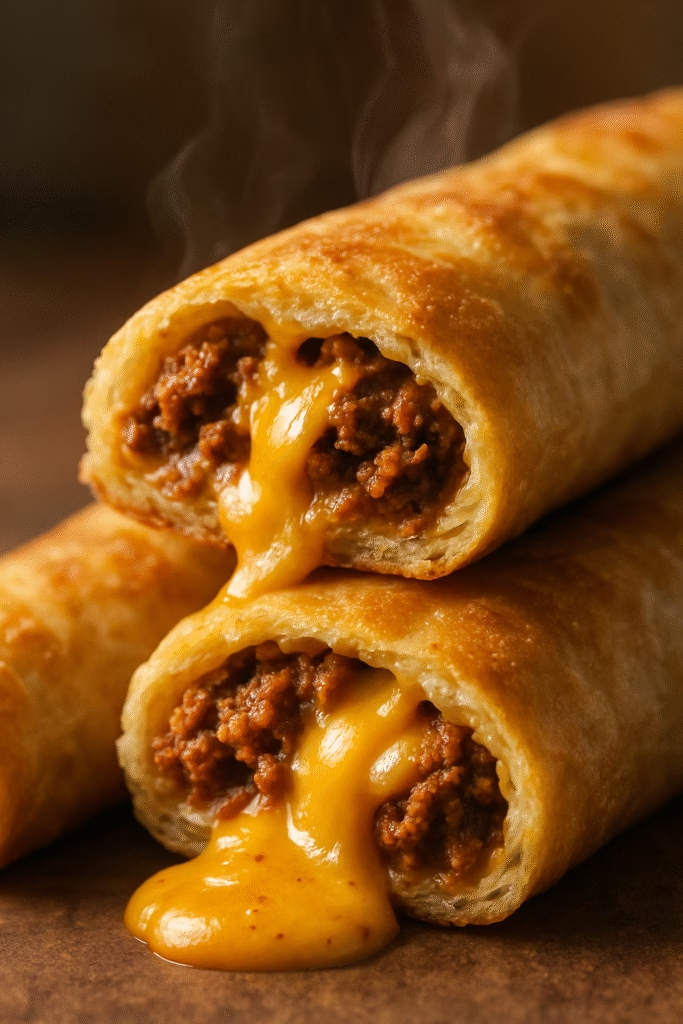
The taco sticks are soft on the outside and melted in the middle. Every bite has warm bread, meat, cheese, and a little spice. You can eat them with your hands, so there’s no pile of dishes. It doesn’t matter if they’re not Instagram-worthy. The point is, they taste good.
Ingredients You’ll Need
Here’s the short list. There’s wiggle room if you want to change things up, but you don’t have to.
- 1 can refrigerated pizza dough (about 13-16 oz)
- 1 cup cooked ground beef (seasoned with taco spices)
- 1 cup shredded cheese (cheddar or mozzarella are both fine)
- 1 tablespoon melted butter
- 1 teaspoon garlic powder
- Salsa and sour cream, if you want something extra for dipping
That’s it. You don’t need a mixer or special baking sheet. Just a rolling pin if you have one. If you don’t, use your hands or a clean bottle.

Step-by-Step Instructions
1. Preheat the Oven
Turn your oven on to 400°F (about 200°C). Let it heat up while you put the sticks together.
2. Prep the Meat
This part is easy. Brown your ground beef in a pan. Toss in a packet of taco seasoning or your own mix of chili powder, cumin, paprika, garlic, and salt. Stir well. If you don’t eat beef, ground chicken or plant-based meat works just as well.
3. Roll Out the Dough
Take your pizza dough out of the can. Put a little flour on the counter if you don’t want it to stick. Roll or press it into a rectangle. You’re not building a house—a rough shape is fine. Cut the dough into eight pieces. You want shapes you can roll up, so rectangles work best, but don’t overthink it.
4. Add the Filling
Spoon some of your cooked meat onto the edge of each rectangle. Don’t go overboard or the filling will spill. Sprinkle shredded cheese over the meat. If you want it even cheesier, add more. If you want less, use less.
5. Roll and Seal
Roll each piece up tight, starting from the edge with the filling. Press the sides closed so cheese doesn’t escape. Place each stick seam-side down on a baking sheet lined with parchment.
6. Top and Bake
Brush the tops with melted butter. Sprinkle garlic powder over them if you like. You can skip the garlic, but it adds good flavor. Put the tray in the oven. Bake for 12 to 15 minutes, or until the tops look golden and you can smell the bread.
7. Serve
Let them cool a few minutes. When they’re firm enough to hold, serve with salsa or sour cream. But honestly, they’re fine on their own.
What Makes This Recipe Simple
There’s no fuss here. The food is warm and cheesy, the crust is soft. You don’t need to let anything rise or worry about yeast. There’s no dipping, dredging, or deep frying. The hardest part is rolling up the dough.
This isn’t a meal to impress anyone. It’s about feeding yourself or your people with something hot and filling. It’s also easy to double or triple. If you want to use refried beans, black beans, or chopped jalapeños, that works too.
Tips from My Own Trial and Error
- Don’t Overstuff: If you put too much filling, it leaks. You’ll get the hang of it.
- Seal the Edges: Press down the dough where it joins. Pinching helps.
- Watch the Oven: Some ovens run hot or cold. If the sticks brown too fast, turn the temp down a bit.
- Mix Up the Cheese: Mix cheddar with mozzarella for flavor and stretch.
- Customize the Seasoning: If you don’t like spice, skip chili powder. Taste the meat before you use it.
- Store Leftovers: These don’t get soggy right away. Keep leftovers in the fridge. Reheat in the oven so they crisp up again.
Who Would Like These?
If you’re feeding kids, taco sticks are easy to eat and not messy. Grown-ups like them too, especially on busy nights. They’re good for parties if you make a big batch. You don’t need forks or knives. The recipe is also good if you want to get your kids to help in the kitchen—rolling up dough is a job almost anyone can do.
Variations, If You Want Them
I don’t always stick to ground beef. Chicken, turkey, or pork are just as good. For a veggie version, use beans or mushrooms.
Here are a few ideas you can try:
- Spicy Version: Add chopped jalapeños or hot sauce to the meat.
- Breakfast Taco Sticks: Use scrambled eggs, crumbled bacon, and cheese.
- Vegetarian: Black beans or sautéed peppers and onions.
- Extra Toppings: After baking, top with diced tomatoes, shredded lettuce, or chopped cilantro.
- Different Cheeses: Try pepper jack for heat, or add feta for saltiness.
None of these changes are required. The point is to use what you have and what you like.
Why Homemade is Better
Frozen snacks are easy, but these taste fresher. You can control the salt, choose your own cheese, and avoid preservatives. Plus, you know what’s in your food. You can even prep them ahead of time and keep them in the fridge until you’re ready to bake.
Cleanup Is Easy, Too
After you make taco sticks, cleanup takes a minute. One pan for meat, one baking sheet, and maybe a knife or spoon. No piles of dishes or pots to soak.
Honest Thoughts
This is not the best meal you’ll ever have. It’s not fancy, it’s not healthy, and it won’t win any contests. But it’s good in the way a grilled cheese or quesadilla is good—warm, satisfying, and cheap. Sometimes that’s enough.
You might find yourself making these more often than you expect. I started pulling them together on nights when I didn’t want to cook. Now I make them by request. They make good leftovers, and even cold, make a quick lunch the next day.
Closing
If you’re looking for something quick and simple, cheesy taco sticks work. There’s nothing complicated about them. No need for special skills or tools. Just basic food that fills you up.

Irresistible Cheesy Taco Sticks Recipe
Course: Appetizers, SnacksCuisine: AmericanDifficulty: Easy4
servings10
minutes15
minutes300
kcal25
minutesSimple, warm, and full of cheese, these taco sticks are easy to make and perfect for a quick meal or snack. Great for kids and adults—no fancy skills needed.
Ingredients
1 can (13–16oz) refrigerated pizza dough
1 cup cooked ground beef (with taco seasoning)
1 cup shredded cheddar or mozzarella cheese
1 tablespoon melted butter
1 teaspoon garlic powder
Optional: salsa and sour cream for dipping
Directions
- Preheat your oven to 400°F (200°C).
- Prepare the Dough:
Roll the pizza dough out on a lightly floured surface. Cut it into 8 rectangles. - Add the Filling:
Spoon some seasoned beef and a bit of cheese onto one end of each rectangle - Roll Up:
Roll each rectangle tightly around the filling. Press edges to seal. Place seam-side down on a parchment-lined baking sheet. - Top and Season:
Brush melted butter over each stick. Sprinkle with garlic powder. - Bake:
Bake for 12–15 minutes, or until golden brown. - Serve:
Allow to cool for a few minutes. Serve with salsa or sour cream if desired.
Notes
- Don’t overfill—too much will leak out.
Seal edges well, and pinch seams to keep cheese inside.
Swap beef for cooked chicken, beans, or a meat substitute if you like.
Store leftovers in the fridge and reheat in the oven.
